Intro
If you’ve not played this game, I thoroughly recommend it, it’s great fun.
If you want to skip a lot of the reading, I’ve made added a Graveyard Keeper playlist to youtube, covering the first 19 days. I don’t talk, sorry, but you can skip through the series to get a feel for the game and learn a few tricks along the way. All told, it’s about 4 hours worth, so yes, skip along!
Menu:
- Priorities
- First week … Week 1, day: [ 1 ] . [ 2 ] . [ 3 ] . [ 4 ] . [ 5 ] . [ 6 ]
- Second week
- Third and fourth weeks
- Effective training and trading: Making gold
- Top ten rules of trade
- Alchemy: components
- Alchemy: work bench potions
- Perfecting corpse crafting
- Fishing
- On onion rings and tavern grub
- Bugs?
- DLCs
- Spoilers!
- Links
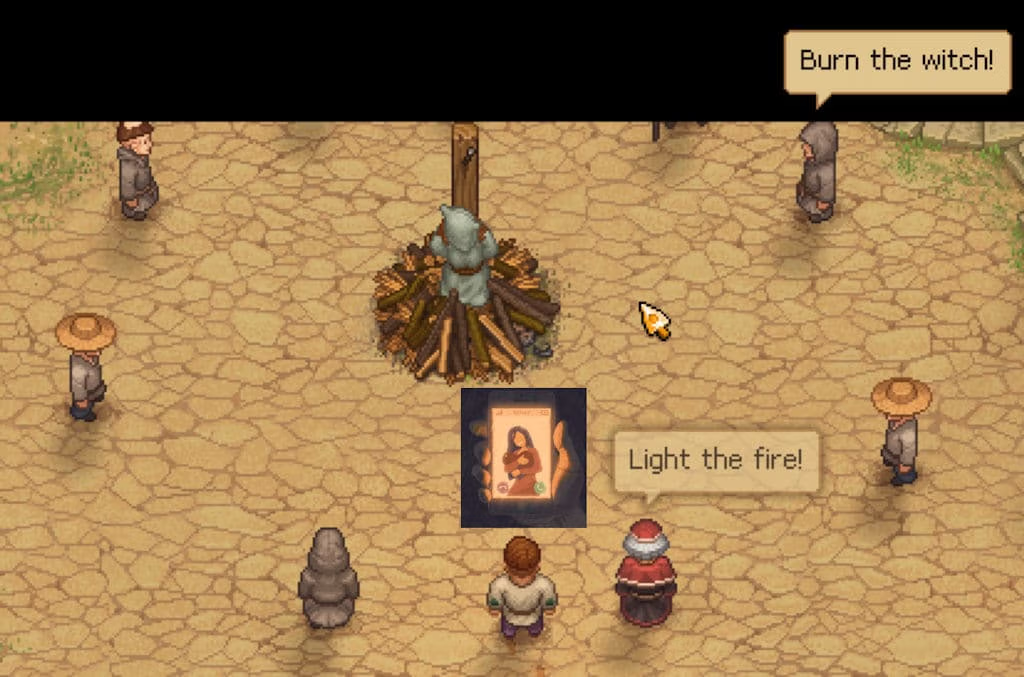
Who can’t appreciate a game were the hero is a passive aggressive psychopath. One that supports burning women, so long it gets him home to his own girlfriend!
An anti-hero serves corpse meat at the witchburninng in the form of burgers, then – silver in hand – slinks off to sell corpse blood to a vampire (who complains that it gives him diarrhea!).
So, with the help of his friend, Gerry (a floating, alcoholic skull with an acerbic wit), and a communist (that happens to be a rebellious, capitalist hating, talking Donkey)…
OK, yes, it’s possible that a bump on the head for the hero resulted in delusions and possibly psychosis, but the willingness to dismember corpses and gorge on their flesh, selling it to others in sandwiches, pies and ‘burgers, that was there already. The guy is definitively a peer of Hannibal Lecter. But you knew this already, at the back of your mind, right.
Your job, while trying to get back to your beloved, is to bury or cremate the recently deceased. Instead you (can) harvest their parts for book bindings, food seasoning, etc., then reanimate them for cheap labour, making beer, carrying lumber, and so forth.
When you think about it…
Man rushes into tavern (newly opened by said Graveyard Keeper)
Bar tender (a ghost, animating a dummy): “You look like you’ve seen a ghost!”
Man: “It’s my dearly departed uncle. I just watched him lumber past me, carrying an impossibly heavy slab of marble!”
Bar tender: “Our new range of beers should calm your nerves, Sir. Care for a hamburger with it? It’s our new recipe, tastes just like chicken.”
Anyway, the initial aim of this guide is to get you up and running at speed, and avoid all the frustrating time hogs, like how to farm blue knowledge tokens, what the optimal research path is, what are the best trees to focus on are initially, and who has all the alchemy recipes.
I will assume, however, that are are playing it and have got stuck at some point and want pointers. Spoiler alert, there may be ‘spoilers’. I am also assuming you have the DLC’s; they really are worth getting if you don’t have them*.
*(This plug was in no way sponsored by Lazy Bear Games. On a side note a case of Nemiroff arrived today from Saint-Petersburg. Thank you Comrade, so unexpected!)
Sorting your priorities
“Everything happens for a reason” is certainly true of this game, and games like it. Graveyard Keeper, in farming terms, is an open game, but sooner or later you start to run into tree quests. You want hops for a slowing potion, or making beer, but that needs the Miller, who needs Ms Charm, who needs, Snake… You get the idea. Note however, as mentioned later, you can get around this issue by clever trading and or by using the appropriate sermon.
Your focus, in this order (up to a point), needs to be Gerry, the church, Snake, Ms Charm and the Inquisitor. And Donkey, if you have that DLC, ‘cos the end reward is worth the trouble.
Do you think this guy is any relation to Shrek’s Donkey!?

Gerry is needy, attend him! Mostly he just wants alcohol, but in return he guides you, if you’ll listen. You need Gerry (and Snake) for the zombies workers, your Tavern, etc., plus his quests are trivial, so keep visiting him.
The church is your initial and main source of Faith tokens, and you need a lot of them, as fast as possible. It will take (game) weeks to gather just the initial essential tokens, and the Sun day sermon is your only source (until midway though the game, and even then, the extra isn’t worth the work). So, don’t miss your sermon! You don’t need a grand cathedral, but you do want to be getting 5 to 12 tokens a week. (Eventually it will be over 20 a week).
Snake is next; he’s needed for all sorts of quests, and to get started he wants 5 Faith tokens.
Alchemy also greedily gorges on masses of Faith tokens.
Ms Charm less important but also wants 5 Faith tokens before she’ll talk to you. Then the Astrologer and Monsignor the Inquisitor.
If you have the DLCs, the Refugee camp and Donkey’s questlines should become a priority.
You don’t have to, of course, play your own way, but it’s likely at some point the chain of event will start to niggle. It goes like this:
“Tell her…” (wait a few days)
“He said that? Really? Well, you tell him…”(wait a few days)
“She said that? Well…” (wait a few days)
Meanwhile, rather like the people at the end of a long queue watching a drama unfold at the tills, other characters are tapping their tutting, and muttering, “Will you just get on with it.” Before you know it, hundreds of days have passed before you can enjoy your first mug of home brew beer.
Your first week and month.
Intro tutorial
Explore everything, make notes, such as where the bees nests are, the apple trees and berry bushes. What reserves are close by, such as the 10 iron ore nodes just north of the house. Talk to people until all the options are explored, including checking any trade options they have.
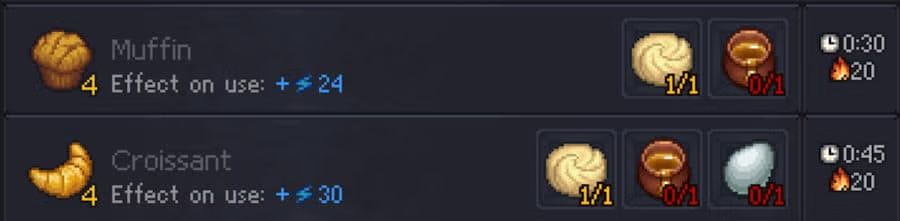
Honey costs 10 energy to harvest, but gives health and 25 energy back. As well as being useful in alchemy, there are some great early recipes with it. ‘Sweet baking’ is available from Miss Chain in the tavern for 2s and includes muffins and croissants.
Week 1. Getting off to a flying start
🧔 I am trying to make a video of this but it’s slow work. Sometimes I have to restart because I mess up. Sometimes I restarts because I’ve worked out a better way.
🐝 And sometimes it’s bugs. It is VERY annoying that I have to waste days because the game does not allow ‘save as’ and a bug means starting the game all over again. Even if you you are hundreds of hours into the game. That is poor design. Noting that I am not using any cheats or hacks just playing normally, bugs to date include:
* Throwing the (first) corpse in the river and having it just sit in the water, rotting out of reach. (Restart)
* Donkey refusing to move or deliver corpses without carrots – despite having carrots (and space for corpses). This is a known bug, over 2 years old and wasd still unfixed!
* Not being able to reach Gunter (This isn’t a bug, it requires specific actions, see later.)
The first week is crucial to set the pace for the game. Nothing wrong with ambling round like a lost sheep, but if you were happy doing that, you wouldn’t be here now, reading this, would you!
All the days of our life
There are no names for the days, so make up your own that make sense to you, or name them for the characters, like Bishop day.
Doesn’t matter what you call them, but you want to give a sermon every Sun day, the Astrologer can only be accessed on a Moon day, and so forth. You can tell the main players as they only appear on their day. If you don’t keep track you are waiting a week to get things done, which takes us to the flying start.
The Astrologer will want a skull. If you learn Anatomy: Hardspares first you should be able to get a skull ready before you see him (for the first time). Similarly with getting the church running; this and everything else is tied to learning to carve stone grave surrounds (worth 5 blue knowledge points per craft). This ideally needs your first knowledge books, in the form of a book from the Astrologer, costing 5 silver. Knowledge is power, but comes at a cost!
However, I found as even better way (though he still wants the skull first). Buy 1 or 2 paper from him (1 silver each). Assuming you unlocked the church, the sermon the following day will give you 3 Faith, while the paper will give you 2 science each. Blood, flesh, skin and fat give 20 blue points each and you only need 20 points to unlocked stone gravestones for blue point farming. This gives you a week head start on getting the church to 20 and the graveyard to 30, as well as allowing you to unlock other advanced skills.
(Selling wood, coal and iron ore are good ways to early silver)
To speed everything along, you also need the Teleportstone, which can be purchased (for 2 silver) from Horadric, the tavern keeper. The Teleport hearthstone allows for fast travelling and is the best investment in the game. Remember, travelling on foot may not take energy, but it is very time consuming, both in real life and in game time.
Day zero to day one
This guide assumes you want or would like to have the maximum, optimum technology in the first week. It’s easy, when you know how. Timing it, well, that’s a bit harder. Got close a few times, but it gets tricky on the last day as you cannot (no how, no way) get blue points before day 6, and you need these to get the church to 20 and the graveyard to 30.
Making it harder still, you don’t even get this quest until day 7, when the Bishop unlocks clay and asks for 20 bowls. It’s not energy that’s the issue, or even mats, if you time prepare well, it’s the fact they all eat into the day and you have to run around like a lunatic, speeding the clock forward. Dig 9 clay, make a potters wheel, make bowls, as so forth. For now I’ll state it’s possible, but a sod to do, and post a video when I get time.
😴 One thing that eats into this is sleep. Sleep saves your progress and slowly restores your energy. Sleep deprivation eats into your energy, until it drops to 50%. To 50, actually; there is no penalty beyond that. As long as you have enough food to work, you can manage without sleep.
You will need learn two forges, learn tools and replace all your tools and -first – make an axe for the woodcutter to get the pasta (‘hand working’) recipe. Using the buff gather all the stone in the area, sell the spare to stone mason and buy wheat early. Then chop down all the trees. Before day six you will have to put down a couple of benches in the church and spruce up the garden.
Additional to all the resources for work benches etc, you’ll also need (at least):
24 simple iron parts (candelabra)
an anvil, iron ingots and 4 more single iron parts to make 8 complex parts (confessionals)
4 flisk (potters wheel) (water in advance, plus 7 clay when unlocked)
40 planks (from flisk) for the benches (6 each), confessionals (12 each) and wooden crosses (1 each).
10 red flowers, 10 stone and 5 peat (for 5 flower beds, worth 10 graveyard points)
(Day 6, 7, extra stone (and clay), plus a stone cutter, to make stone repairs kits and stone grave surrounds.
Put this by the Cabin in the Woods)
Do-able, but relies on timing and a constant supply of food from berries, bread, etc.
Right, I hope you made notes, we’re off!
Firstly, before digging up Gerry at the very start, explore!
During the tutorial you can still do a few things, and there are no jellies or bats, no time, no energy; make use of that.
You cannot gather or anything like that, but you can wander around talking to people. This saves valuable time in the ‘crucial’ first week, and rewards quests, recipes, and teleport points such at the Lighthouse, so is a timesaver. (Once you have the hearthstone). Some of the quests will take time to accomplish due to financial and training costs, but preparation is key.
Farmer will give you a few recipes.
Dig will give you a quest for honey that rewards a cake recipe. Note that this quest requires Gathering unlocking (Gerry), and the Beekeeping skill. However, you will also later need lots of bees, and bees require the Insects skill. Bees (and butterflies) can only be gathered in the daytime. (or you can buy them, of course)
The Lighthouse Keeper will give you a quest for moths and some recipes. Note that the quest needs night time farming, and also requires the Insect skill.
The Gypsy Baron will give you a quest for fish, which ideally requires completing the Lighthouse Keeper’s quest. This again rewards recipes.
The basket of fresh eggs will give you egg recipes.
Woodcutter also has a quest, he wants a new axe. This requires Smithing: Tools, and should be another priority as it rewards a couple of exceptionally useful recipes, such as Pasta, which has the Hard Worker buff. You really want this before mining or chopping a lot of trees down. (With this, make sure your tools are repaired, and work until your energy drops to below half, then buff up and have at it. You have 2 minutes of power-up).
You might also, on your (free range) travels, make other notes.
Cory the Stoneworker sells and buys stone, and also buys firewood, Tress the carpenter sells wood repair kits for 26c – it’s possibly better to buy than craft, (balancing cost against time and energy). At some point you’ll want to explore the swamp. Repairing that bridge requires materials, as does the blockage north (if you want to clear it early to mine coal). There are two berry bushes in your garden, and three more near the lighthouse, along with 2 apple trees.
Here is another little trick:
At the start, after you remove the flesh from your very first corpse, you can put it back again! During the tutorial, when you remove the flesh, it makes the corpse a lower quality. This simple act will improved your cemetery by 1, or at least not degrade it by one, meaning the Graveyard started at -29 instead of -30). Not a lot but it makes less work in the first week.
Another early tip for the first week is when Yorick ask you to exhume a corpse and throw it in the river. Just don’t, that’s a decent corpse and removing it will lower the quality of your graveyard even further! Conversely, though it takes time and silver (exhumation cost), you can also dig corpses up, remove fat and blood and rebury them with +2 white skulls quality.
(If you wanted to experiment – blindly – you can learn and remove, restore organs to see if it improves further. It is also a way to look for possible quality before you attain the cultist perk).
The point here is you need the skills and the skull anyway, and putting an 4 to 8 white skull corpse instead of a red skull corpse in the grave is highly desirable.
(You will eventually needs stacks of skulls, buckets of fat and blood, shelves full of labelled organs, and enough skin to authentically do reprint runs of the Necronomicon Ex-Mortis.)
Day one proper, Sermon
The first day starts after the tutorial intro, which ends immediately after you finish talking to the Bishop.
After your talk with the Bishop, head back to town, talk to the tavern keeper, Horadric, unlocking the vegetable plot. Sell him the burial certificate, then visit blacksmith, Krezvold. Talk to the blacksmith, getting a sword, whetstone, energy potions, and unlocking Smithing. Complete his short quest – you will be rewarded with 5 simple iron parts. Sell 2 back to him, giving you 2s 37c.
Return to the tavern and buy a teleportstone. Teleport home.
Next go to the corner end of your garden, unlocking the garden plots on the way. You will find Gerry near the berry bushes, where it meets the the road. Gerry will give you the gathering skill and bread recipes.
Now you have the skill, gather up the nearby berries and edible mushroom, then teleport to the lighthouse and gather up the apples, mushrooms and berries there – you’ll need all the energy you can get in the first weeks, (and the points). Now, teleport home and go to the to the morgue and give Gerry his beer. He’ll tell you about the cellar, giving you access to that area.
After that, teleport home; don’t walk places if you can avoid it, it doesn’t take energy, but it does speed the passage of days.
Next explore the cellar and get the flour from the sacks.
The buckets have (and nearby beehives) have loot tables, offering nails, flitch, or simple iron parts. If you want to cheese it, save this for just after a sleep and try then. For the buckets, these drop 0 to 3 items, giving an average of about eleven drops total. Best run was 6 iron parts, worst was 0, so it can make a difference to the first week.
For the flour, try to remember to leave a little dough for the pasta, later – I often forget that part!
Ideally you need 6 simple iron parts for the forge and anvil, so you want to salvage three from the cellar. If you are unlucky, you can either start over (meh) or make the anvil, mine ore, sell even ore to get 80c for an iron bar and make the 4 parts for the forge.
Remember to keep talking to Gerry on your morgue visits.
–
Today and in the following days:
Clear the brush from the cemetery. this will improve the quality to -21.
Next repair the worst of the graves (those at -3, -2). Focus on the surrounds and plus wooden crosses (+2). This should take it to -11.
Flower pots add another 10 points, taking it to -1. (Or O if you put the ‘meat’ back in the corpse).
From this point, a few grave surrounds or headstones will easily get the last few points
Remember, you are balancing repairing against removing (time and energy) and crafting replacements. Simple crosses (+1) may be replaced if necessary, but you want to do the absolute minimum if you want to unlock the church in the first week. Two lots of additional wooden repair kits (i.e. 2×4), four wooden fences and five wooden crosses should get the graveyard from -30 to +5.
(You can easily get the graveyard to 5+ in the first week. By the end of week two it’s possible to get the graveyard to 30 and the church to 20).
Top tip: If you talk to the merchant – and don’t rush the dialogue – you will lend you 5s for seed money. He will want 10s back (sometime) but this early in the game it makes a huge difference, so take it!
Your other task in the following few days involves clearing your property of rocks and bushes, mining the nearest two iron ore nodes, and paying attention to point gains, unlocking new skills as required.
Obvious really, physical jobs give red, nature ones green, intellectual ones blue.
Smelting iron is free red points.
Mining and quarrying gives red points. Coal is best as it gives fast points (especially with the Hard Worker food), is lucrative, and is needed for forges and fires.
Cooking is best for green points, farming and gathering too.
Chopping and working wood gives red and green, as does breaking up stone and iron.
Glassware is red, green and blue points, as are others.
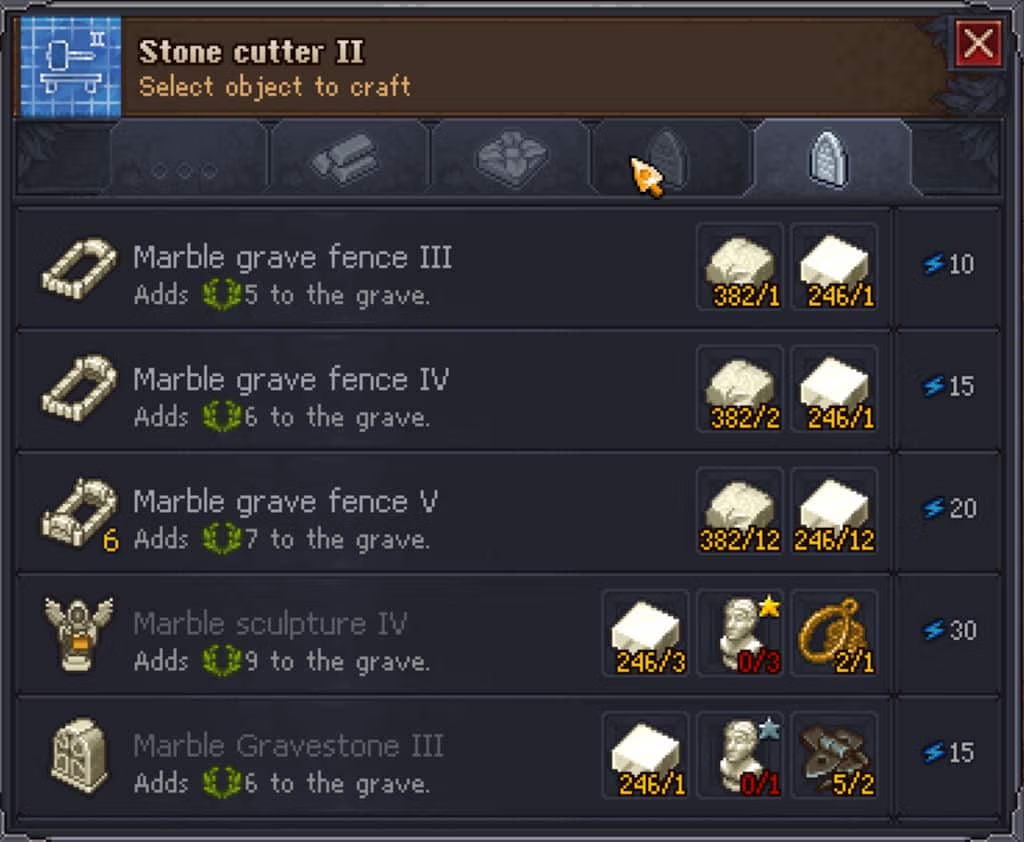
Stone grave fences are great for farming blue points.
Day two.
By the time you are done with Gerry and the cellar it will be the start of the second day.
Firstly, turn the bread into dough, ready.
Now:
1) Clear enough bushes for sticks to Learn Sawing and then make a sawhorse.
2) Cut down two trees for logs and saw them in to billets. Learn Firewood, make a Chopping spot. Chop obne lot (10) firewood and get your first batch of bread baking.
3) Learn Primitive Forging and Make a wooden anvil.
4) Teleport to the Dead Horse and Talk to Ms Charm and the poet, Vagner, then go outside and pick the berries near the blacksmith. Start picking any red flowers you pass (you need 10).
Teleport to the Lighthouse and pick the apples and berries there, then teleport home, where you should have the first few baked bread waiting for you.
5) Gather stone and Craft a Forge.
Day three, Merchant
1) While it’s still daytime and reasonably safe, gather the iron and stone from the narrow marsh at the back of your house, fire up the forge and get the first bars smelting.
You will be ready to sleep now, but that can wait a little longer.
2) First set the rest of the bread baking, then teleport into town and talk to the Merchant, getting his quests, and borrow 5s. Take you time here, don’t spam click, you have to agree to his deal for crops. The merchant will want 10 silver back, in time, but it’s a good investment and will allow you to buy crops now (without selling your iron ore).
The merchants quests are a lower priority, so his veggies can wait a bit – your immediate needs are greater!
3) Then visit the Shepherd to buy 30 peat and the Farmer for a selection of seeds and maybe a little flour. Teleport home and sleep.
Day four, Snake
Snake day, no-one really to see, keep plodding away at the cemetery, training, etc.
1) Yorick will be there when you wake up. Talk to him, then set your mushrooms or some bread baking. Ignore his quest for the moment.
2) Set you more iron smelting and learn Tools. make two Axe (1), one for the woodmans, one for you. The rusty one you can sell to the blacksmith (for 75c)
3) Plants your seeds, remembering to add peat as fertiliser first.
Note: Initially, you peat from Shepherd to apply before planting, it’s dirt cheap and does note a difference as it returns +1 seeds, +1 produce, gives
20% reduction in growth time.
4) Donkey should be along about now with a fresh corpse. Learn Hardspares and Softspares and remove the blood, fat, bones and skull. Bury the corpse (for burial fee.) Take one of the axes to woodcutter for the pasta recipe.
5) If it’s not too late – and you remembered to save a little dough – buy some cheese from the dairy lady. Pasta makes a big difference.
Day five, Inquisitor and witch burnings
(Before long the Inquisitor will give you permission to use his vinyard and ask you to set up a burger stand. This needs gold onions and gold beer, which takes time (and silver) to built up to, but it worth it as the event gives 33s silver a week and leads up to unlocking the Cultist trait and quality zombies)
1) Lying is the best option, when faced with the inquisition. Just saying.
2) Remember to keep the forge hot, the iron smelting. You should have enough iron now, or soon to make yourself a better shovel and pickaxe. (Sell the rusty ones to the blacksmith)
3) For the rest of the day, clear the brush from the graveyard and start repairing the graves, starting with the worst.
Teleport home and sleep (as you should need it by now)
Day six
1) Visit the Astrologer and talk to him.
You can’t get enough reputation with the Astrologer to buy the (level 2) book you need this week, but when you return the following week it should be be available. If not, buy, sell or quest for him to unlock.
(If you haven’t already worked it out, you can trade Firewood with the innkeeper for food, and with the Lighthouse Keeper for fish. Trading also give reputation.
Remember, you can chop a lot of wood in a short time with the Hard Worker buff from pasta. Especially later, when you have a couple of zombies gather the logs for you.)
2) Donkey will probably drop off another corpse today, remove the bllod, fat and maybe skull and bury it.
3) Learn Decay (for compost heaps), Simple Grave Stones and Carpenter’s worksbench. Make the workbench. If there’s time left in the day, start making grave surrounds and markers – no omore than necessary.
Week two forward
Week two, day 1 (Bishop)
1) time will probably be tight, but you should have enough time to tidy enough graves to get the quality up to 5
2) Talk to Bishop and give your Sermon. This awards you your first three Faith. If you have 2 clean paper you can use those to identify a blue item (e.g. skin, blood). These give 20 points each, enough to unlock stone grave surrounds and allow blue point farming.
You will probably need to sleep now.
Week two, day 2 (Ms Charm)
1) If you have the DLCs, you should meet Marquis Theodore Jr. and his Refugee camp (followed shortly by the vampire drama). This is good too as it saves you removing the blocked path.
I would give his quest lines priority, along with the church and Inquisitor.
(Note that the Marquis chain – and everything tied to it – can be frustrating and at times (I find) buggy to the point of needing a restart. Some parts of the game are like this because you need to progress someone else and some… no, it’s a bug. Click too fast, miss a dialogue option, build in the wrong order, some other weird RNG thing, who knows. One time I got a load of rewards and the Witchers eye token before unlocking the vampire, another, I was locked out of getting it no matter what.
My current feeling is it’s best to concentrate on plots and gave them farming for you.)
2) If you have spare, leave them a little food and water – then need 3 water and 30 energy (2 bread) per day per refugee.
3) Learn Beekeeping, Stone Cutting and Mining and heed to the Cabin in the Woods. From there, find the coal seam, eat your pasta and mine until your pickaxe breaks and needs repairing (about 550 coal).
4) Return to your home, fix the pickaxe, check the garden, setting up compost if you haven’t already and get more good cooking.
Week two, day 3 (Merchant)
1) Visit church cellar, if you haven’t already and explore. Learn Church Workshop
2) Visit town, see the merchant and buy 2 (or 4) silk, and see the farmer for more seeds.
3) Learn Anvil and replace the wooden one. make complex parts for the church workshop.
Sleep (as required)
Week two, day 4 and 5 (Snake) (Inquisitor)
1) Get dragged into a vampire hunt (with DLC)
2) Make sure you get the Inquisitors his next quest (for flyers and firebook)
2) You should have a corpse lying around, left by Donkey. Strip it clean, including the skin, and head to the church to make a workbench
3) Make 4 pigskin and use then to make 4 paper, then identify any three ‘blue’ items, like blood, fat, flesh. This will give you 60 blue spiritual knowledge points.
4) Learn:
You’ll need a lot more fast, but this will get the church up and running, and Stone Gravestones allow you to start carving surrounds, each of which give you 5 blue points each. Make enough for the cemetery, any extra can be deleted (see later).
Everything else rides on how you spend those first early points. Remember, the church has needs, but so do other professions, like smelting. You have unlimited blue points available via crafting (and discarding) stone gravestones (etc), but doing so takes time and energy.
Week two, day 6 (forward) (Astrologer)
This is really the point where you decide the direction of your game, how you aside blue points, and material farming. There simply is not enough time to do everything in a day or a week, especially as the points and materials needed to progress become more expensive to acquire.
You can visit the astrology and buy a blue book (5s) and get a jump on 25 blue points, or you can take the time to gather and cut stone into grave surrounds and spend the silver on seeds. The important thing at the minute is to get the quality of the church up and this means more faith.
Getting the church to 20 is a bit harder, but do-able with a couple of confessionals and benches, and a candelabra or two. So lots of wooden planks, lots of iron parts. Keep the forge going all the time and stock up on wood. Getting the church to 20 also guarantees your first sermons are a success, giving extra Faith and more donations. Clearly highly desirable in this game.
For advance planning:
Candelabra I adds 1 church point and requires 6 Simple iron parts each. (Candelabra take candle too).
Candelabra II adds 2 Church points, but costs 4x Simple iron parts and 4x Complex iron parts each.
(Regular) benches are easier and give another 1 point each, cost is 6 wooden plank and 4 nails each.
Last and arguably the best are the confessionals, which you can have two of. These add 5 points each and also give a chance for a Faith token and a bronze or silver story (each).
Cost is 12x Wooden plank and 4x Complex iron parts.
 :
If possible before the bishop leaves the next day, finish up graveyard, attend crops, sleep.
Your next two tasks in coming weeks from the Bishop will a quest for ceramic bowls (x20) and after that, get the church to 20, the graveyard and 30. It typically takes a few weeks for this, but you can plan ahead now and possibly complete both on on this day. Won’t be easy though.
You cannot learn clay working until then, but you can farm the material for the potter’s wheel and put it to one side. It just needs 4 flitch, 2 piece of stone and 6 nails.
You could/should be making a lot of plus +2 stone surrounds, so they can be applied to the graveyard, but the easiest points boost is flower beds (under theology). Each one adds 2 points, and takes no energy to plant. Requirements are trivial, just 2 piece of stone, 1 peat and 2 Red flower. Put down as many as you can.
If you do not have all of this in place by the end of day six, or early on day seven, don’t worry, you’ll have it for the following sermon, now you know exactly what you need.
 :
Going forward
Repair the bridge the swamp, visit Clotho, learn alchemy, and fix her bridge (6 flitch, 3 wooden plank, 10 nails).
Get hiccup grass (ahead) ready for him today if you can, next week if not. Visit merchant, buy 2 to 4 silk for him (for Refugees tents).
Plant the carrots if Donkey has left you a ‘deposit’. Sleep.
Map of path through swamp to the Clotho, in the witches hut below:

Week 3. It never ends
Sunday again. Talk to the Bishop to learn gathering clay and sand, and give your sermon. If you followed the instructions, you should have at least 7 Faith tokens now, enough to open a dialogue with Snake in the cellar (he’s there of a night time, lurking, initially). This will give you the Instructions for the Key. You will also be able to identify it, which opens up Snakes chain, the dungeons, and your first zombie, via Gunter.
Time to use that cremation too – you don’t want to bury ‘bad’ corpses, but you do need a lot of ash and salt, Plus, Donkey won’t deliver more if you are at corpse capacity.
By now you’ll have realised you keep running out of energy and need to grow and cook your own meals, so Farming: Gardening is your next target. However, don’t forget the bishop wants those bowls for the next sermon – if not sooner. As for why you focus on the church, you need the Faith tokens. Lots of them, for Snake, for Ms Charm, for knowledge, and you need 10 for each zombie you resurrect.
I thought this was bugged at first, but it’s a bit convoluted to unlock. Gamepedia helped me out, and steam forums:
“In order to be able to access Gunter, you need to examine the zombie work areas such as the large tree or Iron ore mine. Then, next time you go to the morgue, a dialog will trigger with Gerry and he will tell you about this chained up zombie you need to check out.
Also requires that the gate behind Snake is open. Once you go to Gunter, another event will trigger where you need to open the gate by pulling a lever.
HOWEVER, additional to all the above, it was still bugged for me and the reason is a time lock. According to one post on the steam community, the dialog with Gerry will not unlock or commence until day 19. I have confirmed this. You need all the above AND the game advances to at least day 19.
Week 4. And so it goes
You’re getting this. Hand in the bowls (if you haven’t already), get another quest, aim to complete within the 6 days (or even the same day!), while doing as much farming and side quests as possible along the way.
Making money: there’s gold in them there hills!
Effective training and trading
Later on, much later on in the game, perhaps hundreds of hours into the game, you can have scores of zombie workers, vineyards, breweries, trade networks, a tavern and more, all pulling in lots of money. In fact more gold than you can ever really spend. But early on, every last silver counts. Here, mining is your friend.
Head north to the cabin in the woods and its quarry and you’ll find a coal seam, an iron seam, stone and marble quarries, and a mine for Zombie workers, but the prime interest is the iron seam.
You also ideally want to be buffed up, so take a spare pickaxe or two, lots of energy food, and at least two types of special food. You are looking for recipes with ‘slow metabolism’ (extends the duration of buffs) and ‘hard working’ (the buff you want). Hard working is only effective when mining or chopping wood, but you expend far less energy than normal. A single buff will let you carve out dozens of blocks of ore (or stone). Masses of it!
Ore is nice, steel, silver and gold is better, so – in order – you also want to push building to include precious metals, and smithing as far as jeweller. Also towards steel tools, for the best pick-axes (before the ice axe). I’d also suggest working towards having two or three level III forges. Besides your own use, these will let you farm ore to craft ‘steel parts’ to sell to the blacksmith, and silver and gold to sell to the merchant (and moneylender). Early game this is the best way to earn money.
Those skills need knowledge points, but we covered that in week 2, make a load of ‘stone grave fences’ to get the points you need. 10 such fences award 50 blue points, and stone is so easy to mine (with the buff or using zombies) that it’s better to delete the fences than salvage. Wasteful, but you have an unlimited supply of stone and it takes a lot of energy to salvage the stone.
It’s always good to do the maths in situations like this. Buffed, the energy needed to carve stone is negligible, zero if you have a zombie or two quarrying it, so we can ignore that cost.
Crafting a fence takes 20 energy and uses 2 stone. This is really slow, time-consuming.
Salvaging 1 stone from a fence takes 10 energy, and it just as slow as crafting a new fence
To emphasise the point, it’s faster to work a block of stone than it is to break up a fence. Breaking up 600 fences requires 6,000 energy and many days, breaking up 100 stones takes 1,500 energy, in fraction of the time. Both result in 600 pieces of stone. QED, don’t bother, just delete the fences.
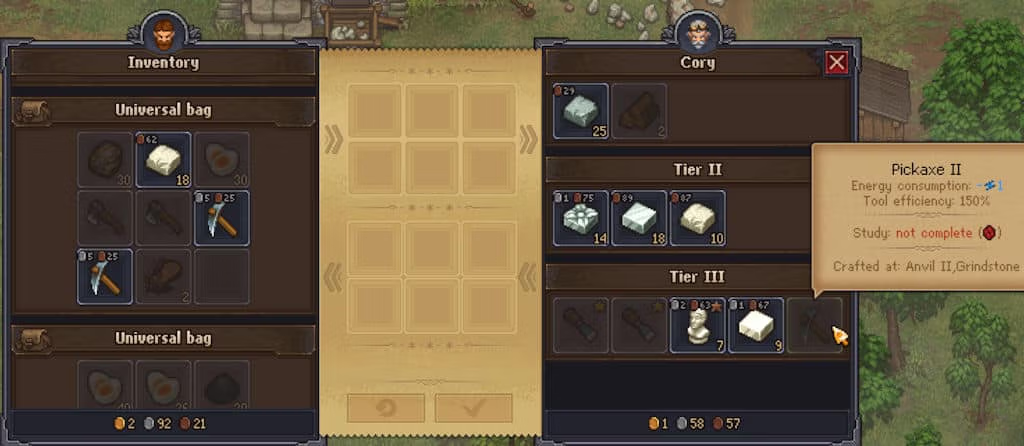
Who buys what. Top 10 trading rules
There is an old /reddit post: Who to sell items to?, but it’s over two years old and does not include newer vendors, such as those in the Refugee camp, or Clotho.
First general rule of thumb, if a vendor sells an item, they will buy the item, for 25% less. Thus if they sell pies for 1s, they are likely to buy that same pie for 75c.
However, I have noticed a certain consistencies and inconsistencies that point to one conclusion: the developers, whether through time, budget constraints or sheer apathy, didn’t code all the purchases they planned. I dare say it is filed under, “not important, do it when we get round to it.” It could be game economics related, but that makes no sense given Krezvold will buy unlimited ore and coal, but he won’t buy an iron chisel. Nor will he will one one back.
Second rule, if a vendor has an item greyed out, they want and will buy that item. Typically it is just firewood, but there are exceptions (notably the blacksmith). The Bishop is similar, he shows (grey) loads of sermon, which you crave and want, but he’s only buying, not selling.
Third rule, they will buy all you have, up to the point of bankrupting themselves.
Fourth rule – memorise this one – if you bankrupt them (reduce their cash to zero) they cannot trade in the interim. That is to say, if you take their last penny, their balance is permanently zero. This is a bug, I believe, not a feature. You can fix this buy buying something from them so they have capital to trade.
Fifth rule, the longer you leave a vendor, the more silver or gold they will have when you return (unless you bankrupt them, of course).
Sixth rule, you can open vendor tiers sooner using the Sermon of Prosperity, but there are other ways. For instance, many will buy firewood. Trade firewood for items you need, or simply for items you can afford, and sell them back. Rinse and repeat. You do take a loss, but it opens up the tier 3 items such as jointing. This can be beneficial as it will, for example, allow you to craft items for the church before earning all the blue points needed to unlock all the necessary skills.
Seventh rule. Time is money. Unless you are desperate, or unlocking tiers (as with rule 6), focus on the easy to achieve high volume or big ticket items. These include:
Cory the Stonemason will buy all your stone and marble. Again requiring tier 3, Cory will also buy tier II shovels, also for 5s.
Tress the Carpenter, who will buy all you wood. Similarly, at tier 3, Tress will also buy tier II axes, again for 5s.
The Merchant and the Moneylender, who will buy all your silver and gold ingots.
Firewood is gather, chop, sell for coppers, while a selection of 20 tools will earn you over a gold.
Incidentally, the big, easy earners in the game are selling burgers at the witch burning, and selling beer and food your own tavern.
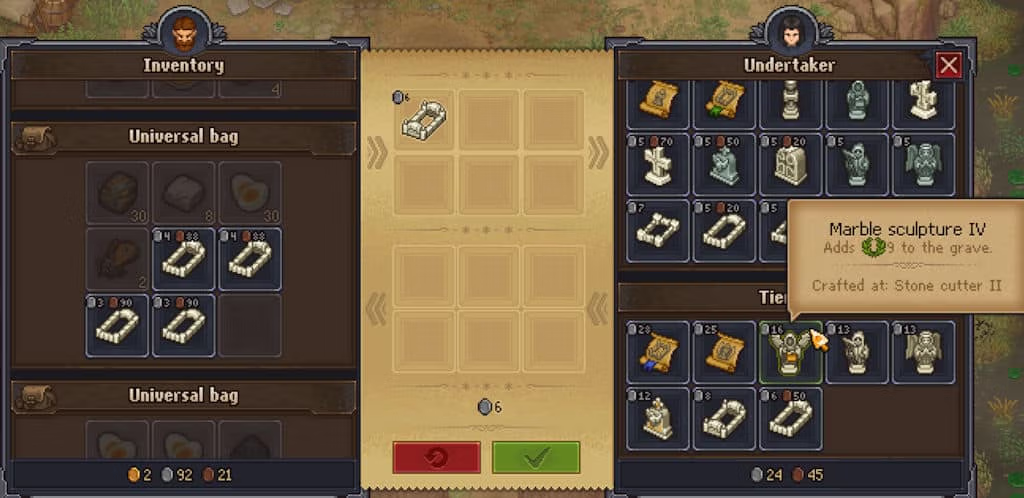
However, at least until the developers fix certain bugs*, smarter playing will pay dividends every time. For instance, the time and cost to make an angel statue is prohibitive, yet they sell for only 16s each. Just one of the components (gold jewellery detail) is worth over 37s (or costs 50s).
*(I have told them).

Eight rule: Bugs can be expensive!
In an MMO, the above would be considered an exploit, however, the same MMOs might describe a different bug as “Working as intended”. (Looking at you, Blizzard). In this case the bug is recipes, at least those you can purchase. You can only use them once, then you know them. No point in buying it again. Unfortunately, due to a lack of checks, the recipes are never removed from the vendors lists, you are never warned you already have them, and they won’t buy them back. For a 1s recipes, fine, but a 3g recipe, that’s unacceptable. I only made that mistake once, with a 1s silver recipe, and it annoyed me immensely – so it’s not about the cost. Fix your shit, Lazy Bear!
Alchemy: getting started
Now to reveal where all the alchemy recipes are in the game.
Have you guessed yet?
Yea, well, about that, the recipes are generally not in the game, you have to guess, and there are a lot of permutations, hence guides like this.
Strictly speaking, that’s not wholly true, but it’s close enough. You can get your first free alchemy recipe on day seven, when you unlock the church, but it needs so much work to do anything with it.
You also need to speak to Clotho in the western swamp to unlock the alchemy tree. You can possibly do this as soon as day two.
Huzzah!
However, the lab is in the church cellars, which you can’t access until at least day seven.
Bugger!
However, you can tunnel through and access it early!
Huzzah!
Alas though, the lab is trashed, so you have to rebuilt it, and you lack the skills, the materials, and the components. Furthermore, you cannot use, grind, mill, or distil anything until you have identified the usable items, which requires Faith tokens and other stuff. As you can see, we are talking about running around in circles and lots of time and farming.
Bugger!
The plus side, at least, you don’t have to find the recipes in game (if they even exist), you just have to enter the right combinations and the game will log them for next time. There are recipes to be found, or bought, but they are few and far between, such as clues (no recipe), or recipes towards the end of the tavern chains (weeks into the game) that you have needed since meeting the poet on day two.
Alchemy: priority list
This list is to save to time – and faith orbs.
batwing
BEE
BEESWAX
Bones (or limestone)
BUTTERFLY or moth
CROP WASTE
eel
GRAPHITE
GOLD nugget
HEMP
HICCUP grass (or carrots, cabbage)
HONEY
HOPS
INTESTINES (or sulphur)
ONION
PUMPKIN or lentil
RED FLOWER
SILVER nugget
SKIN
WHITE FLOWER or green jelly
YELLOW FLOWER or maggot
These should cover nearly all your needs (bar death powder); optional extras/alternatives include maggots, fat, green jelly, brain, heart).
Anything else is just points as most other items cannot be used in alchemy.
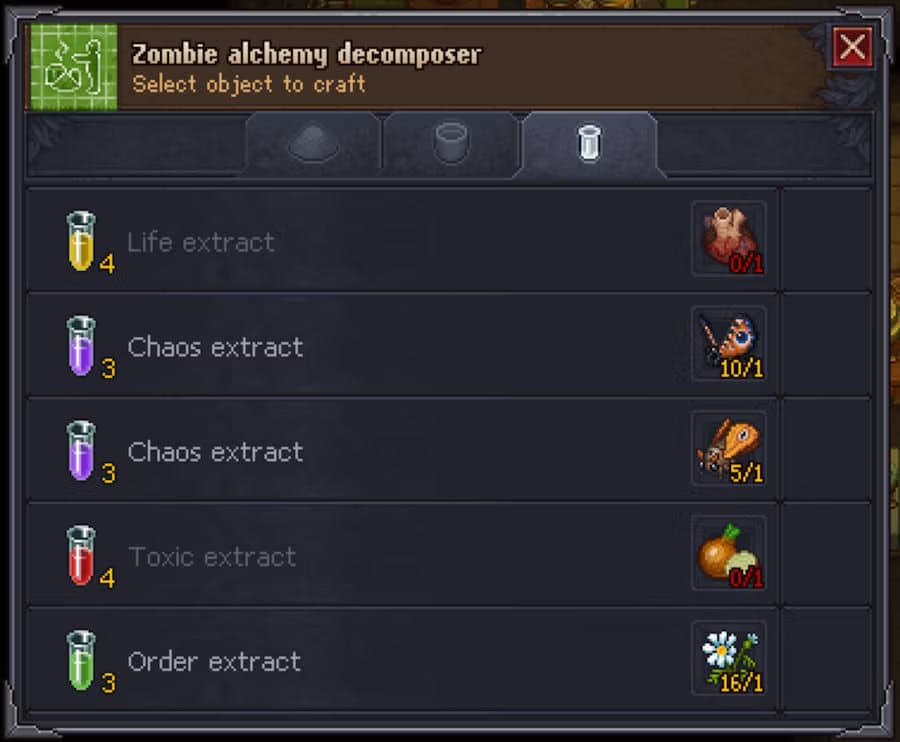
Alchemy, part one: components
Some things – like limestone and maggots – you’ll naturally get more than you can ever need or want to store, others you’ll think you might not need, but end up wanting buckets of (ash, blood, fat), while the rest needs active farming, and in the case of gems, luck.
Extracts (vial, distilled)
Acceleration – HEMP, (or blue jelly)
Chaos – butterfly or moth
Death – dark heart, black jelly, or BUY from Clotho (easiest)
Health – lentil, pumpkin, or nori(?)
Life – MAGGOT, or YELLOW FLOWER, (or a heart)
Order – WHITE FLOWER (or green jelly)
Slow – BEESWAX, (or a spider web)
Toxic – ONION, (or orange jelly)
Powders (milled)
Accelerator: HEMP, or honey
Chaos – butterfly, (or bat wing)
Death – dark intestine, or BUY from Clotho
Electric – eel, BUY from Clotho (easiest)
Graphite powder – graphite
Gold powder – gold nugget
Health – CROP WASTE, cabbage, or pumpkin
Life – SULFUR (sulphur), or intestines
Order – BEE, (or faceted emerald), or buy from Clotho
Silver – silver nugget
Slow – hops, (or spider web), (or pyrite), or BUY from Clotho (easiest initially)
Toxic – RED FLOWER, or an onion
White – limestone, or bone
Solutions (crucible, hand mixer)
Acceleration – honey, (or blue jelly)
Chaos – moth, (or bat wing)
Death – dark brain, or black jelly, or BUY from Clotho
Health – cabbage, carrot, or hiccup grass
Life – brain, MAGGOT, or yellow flower
Order – WHITE FLOWER, green jelly, or a bee
Slow – beeswax, fat, or hops
Toxic – RED MUSHROOM or orange jelly
Vine Press, for oils
Seed oil, use hemp seeds
Oil, use fat (from corpses)
Other, and comments
Ash (from cremating corpses)
Salt (from cremating corpses)
Blood (from corpses)
Fat (from corpses)
Alcohol (use Booze, crafted)
Hops (need to unlock the Miller)
Sulfur and limestone are from mining coal (needs talent)
Graphite is from converting coal in a furnace
Dark organs (heart, brain, intestine) requires a long chain of quests with the Inquisition to unlock ‘Cultist’.
(This cost is returned when you identify the the items).
Eels (from fishing in the sea or swamp)
(Most of the other more exotic items are from the dungeon levels. They do not respawn.)
Alchemy, part two: Breaking bad chemistry
You need all the mills etc, and both alchemy benches. If you have the DLCs, the zombie work stations are recommended as well, even if you don’t use them – they have neat feature to remind you what’s what.
Alchemy Workbench 1, two potion mixes
Black paint: graphite powder and water
_ (or ash and oil)
Energy elixir: acceleration powder, then slowing solution
_ (or slowing powder, then acceleration solution)
Dark elixir: death powder, and blood
Energy potion: acceleration powder and acceleration solution
Freshener: oil and order solution
Growth enhancer: ash and life solution
Heal potion: Health powder and chaos solution
_ (or life powder and health solution)
Spices: salt and health solution
White paint: use white powder and oil (best option)
Zombie juice: health powder and blood
Alchemy Workbench 2, three potion mixes
Acid: toxic powder, chaos solution, then toxic extract
Alkali: life powder, death solution, then blood
Balsamic Solution: chaos powder, water, then death extract
Aromatizer: acceleration powder, alcohol, then life extract
Berserk potion: toxic powder, death solution, then death extract
Digestion (appetite) potion: health powder, toxic solution, then acceleration extract
Flavour Enhancer: ash, toxic solution, then life extract
Glue: health powder, life solution, then chaos extract
Golden Elixir: gold powder, toxic solution, chaos extract
_ (or Gold powder, order solution, then health extract
Preservative: life powder, slowing solution, then slowing extract
_ (or slowing powder, life solution, then slowing extract)
Protection potion: order powder, slowing solution, then slowing extract
Rage (damage) potion: chaos Powder, death Solution, then toxic Extract
Restoring Potion: order powder, health solution, then health extract
Silver Elixir: silver powder, order solution, then life extract
_ (or silver powder, chaos solution, then order extract)
Speed Potion: acceleration powder, chaos solution, then acceleration extract
Tanning Agent: slowing powder, death solution, then order extract
Embalming potions etc
This are all in a tab in the Church Workbench, not made in the alchemy cocktail blenders
Making the perfect corpse or zombie 🧟
In the initial version of Graveyard Keeper, a 12 skull corpse or zombie was possible, in the latest update, with the DLC content added, a 16 skull corpse is possible. This makes raising the graveyard score much easier. Too much work for my liking, but I’ve seen pictures of graveyards with scores around 2,000. Overkill, but each to their own.
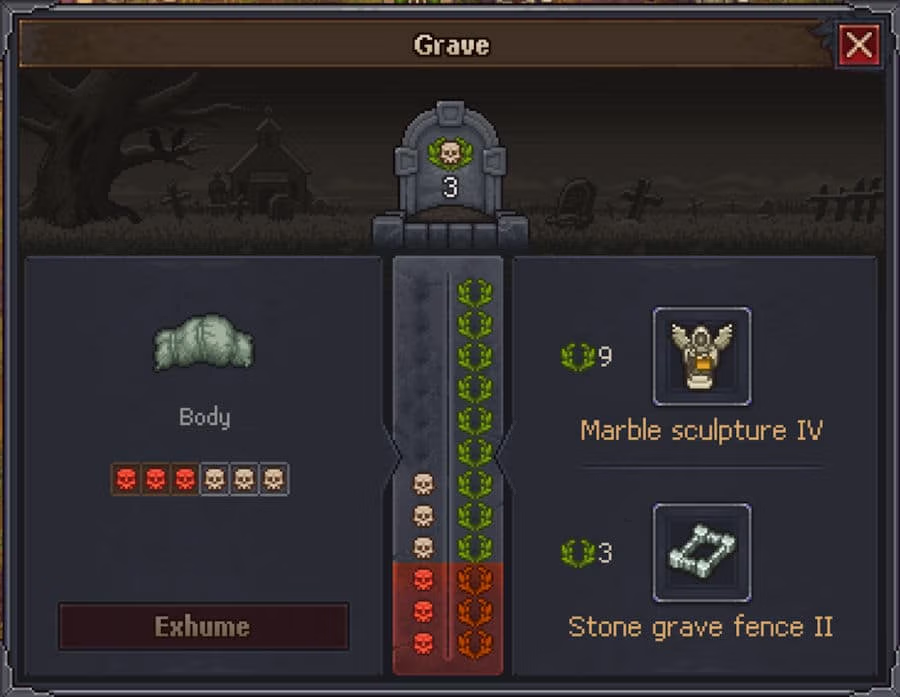
Note however that putting a marble statue on an bad corpse does nothing extra! The headstone and grave surround and interred corpse need to match. As in the image below, this grave has a range of -3 to 3. Without ornamentation it takes three points off the graveyard, but adding 12 or even 16 points of marble will not take it above 3.
NOTE that, really, for this you need to progress the inquisitor requests up to serving burgers, repeat that 3 times to unlock dark organs, then identify them and learn the Cultist perk. To expedite this, you can should be working on beer and onions as early as possible and be building lots of fridges to store a quantity of fresh corpses ready.
Removal, by the parts
You can’t properly see the state of the organs, but even early on in the game you can (at the cost of time and energy), add, remove and replace organs to see how it changes the body.
Fat (good) (swaps a red for a white)
Bones (neutral)
Organs (varies)
Used with injections, the best heart and brain are +3 red and +3 white, while the best intestines are -2 red and +3 white.(Noting that it’s the balance that’s important, rather than which organ there are on)
However, for burial without treatment, you need either all white, or the red cancelling each other out. With blood, fat and organs removed you have a +2 corpse. You can often easily improve this to +4 or +6 just by removing or swapping one organ.
Note that if you have the DLC, white skulls can also be added to organs via the soul room workbench.
Skull (bad) (adds a red skull)
Skin (very bad) (adds a red skull and removes a white skull)
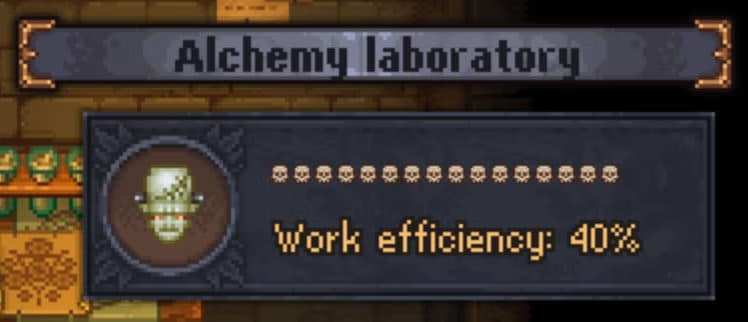
Of more interest to some will be the benefits to the slave labour, that is to say, the zombie workforce. I read on /reddit that skull adds 2.5% to Zombie efficiency, so as below you can end up with a zombie at 40%. Some jobs, like the greeter at the Talking Skull tavern, or gardeners, it makes little to no odds, but for others like miners the difference is noticeable. I did read on /reddit that a 19 skull zombie was possible (because red skulls count), but this was a bug that has since been patched.
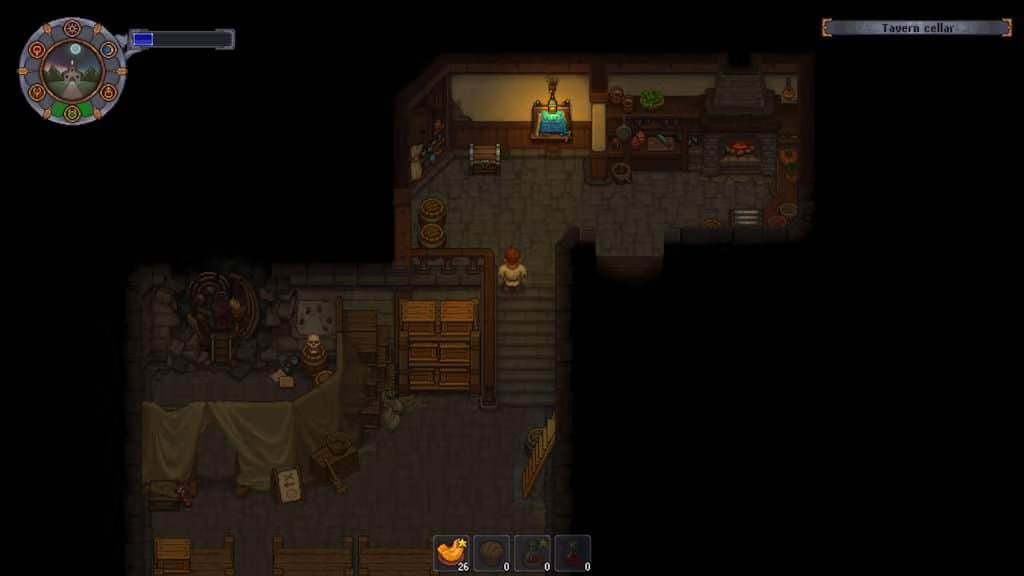
If you are wondering how to see this figure, just stand in front of the (working) zombie and look to the top right corner of the screen.
It depends how you play the game and much spare time you have and want to put into the game, but the more completist and target driven players will need rather a lot of high quality Zombies. Mining, quarrying and woodcutting adds up to 7, gardeners and vineyard workers are another 14, then you have the crate factory, the alchemist and text generator zombies, the greeter, the zombie brewers, and all the porters. As you can see, you are soon looking at over 30 Zombies. They don’t all need high skull ratings, but it helps.
If you swap your weekly sermon to ‘Prayer for repose’ (ideally gold), it supposedly increases the quality of the corpses Donkey fetches, at least in terms of vital organs, improving the chance of 5 and 6 skull hearts, brains and intestines. The wiki saw this is broken and certainly I can see not evidence of it.
Note also that dark organs only start to appear after you as asked to identify them. (i.e. When ‘Cultist’ is added to your tech tree).
On embalming injections
Glue injection is +1, so great.
Silver removes one red (such as that added by the lye) and turns it white, then adds a white.
Gold removes (flips) two red and adds two white white.
However, gold injection does require red red first, so…
Dark injection. Interesting one this. Mostly it’s bad as it adds 2 red skulls, but the gold injection requires 2, so it’s useful in this case.
…
Acid removes a red, but also removes a white skull. I fail to see this as useful.
Restore injection halves decay rate. Organs don’t degrade, corpses do, just take the good parts out of the corpses and cremate. Don’t waste time with restoration.
Preservation. Zombies do not need preservation, and interring a corpse halts decay, so it’s of dubious use. However if you leave a corpse on the embalming table, it will rots. Just don’t leave the corpse there!
Above version shows making a 16 skull corpse in Graveyard Keeper. 10 minute, real-time crafting, only the first and last minute minute matter, feel free to skip through the middle.
Short version:
Remove blood and fat, and poorer organs,
insert:
brains (ideally +3 red, +3 white)
heart (ideally +3 red, +3 white)
intestines (ideally -2 red, +3 white)
Inject lye, glue, silver and (dark if requires) gold.
Finally resurect with zombie juice.
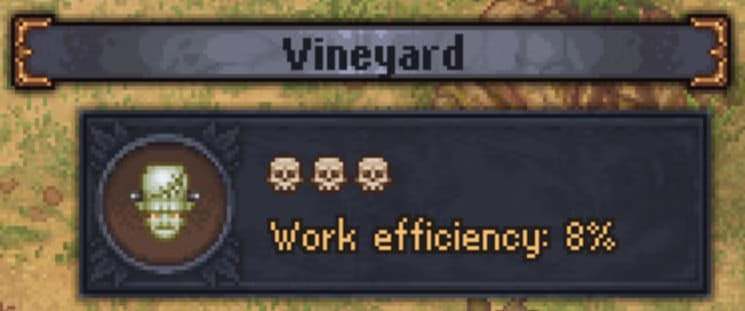
For comparison, below is the starter Zombie you get, this has 3 white skulls and is only at 8% efficiency.
Making a 16 skull corpse.
As bodies come in, you are ideally looking for brain and a heart with +3 red and +3 white, plus intestines at -2 red and +3 white. Store then away until you have all three.
Preparing the corpse.
1) Starting with a organ free corpse, remove the blood and fat, leaving the skull, bones, flesh and skull. You are now at +2 white.
(This part can be done at the end instead).
2) Add the heart (+3, +3), brain (+3, +3), and intestines (-2, +3).
3) Add glue injection (+1 white)
4) Add lye injection (+1 red, +1 white)..
5) Add silver injection (-1 red, +1 white)
6) Add gold injection (-2 red, +2 white).
7) Bury, or apply zombie juice as required.
I’ve added a realistic video below, so it’s over 10 minutes long, only the first and last minute really matter, the rest is time filling while the injections are applied.
Fishing in Graveyard Keeper
Fishing is a mini-game, and it’s horrible! Regular in-game fishing, with say WoW and other MMOs, no problem, but this…, no.
It gets better once you master it, but it’s still clumsy, annoying, boring, and it’s buggy.
Also, it’s complicated. Whether you consider this good or bad is another matter, but it’s important you understand this, and some of it is not logical.
Some fish are best or only cause at day, or at night. (Fair enough).
Some fish want no bait at all, some want a specific bait, other want an expensive (and consumable) lure. Just why a steel lure is consumable is beyond me.
The better the rod, the better the chance of success. Or not! Fish are particular about which rod you use. Some cannot be caught with a cheap rod, but others cannot be caught with a good rod.
I had to read a few guides* and still needed several attempts to begin to get the hang of it. There’s two bars, one yellow (left) and one green (right). The green bar, supposedly progress, is just a nasty distraction, you need to focus on the yellow block, using ‘e’ (or left click) try to keep the bar over the fish. Clunky and frustrating does not begin to cover the operation.
If the devs are reading this, this is not fun!
As for the bug, if you have universal bags etc. from the DLCs equipped and your bait is in those, the game cannot see your bait. You have to move the bait out of those bags and into the main inventory. This is true even if the bait is in a fishing bag. I have reported this bug.
Made a short video of fishing in the game, below. Equipping a better fishing rod, using (the right) bait, and using fishing buffs are a great help. As with mining, you want food with the ‘slow metabolism’ buff, then food with ‘Fast reflexes’ (a little longer to hook a fish) and ‘Good fisherman’ (less chance to lose the fish).
Keep the yellow bar over the fish until you automatically reel it in. Ignore everything else when playing!
Negativity aside, there is a plus. Fishing, while it consume a small amount of energy, pauses the timer, so the buffs last for a long time and you can stack up a lot of food or fish for sale without the day advancing. This makes it potentially lucrative, and energy efficient. Plus, achievements, if that is your thing.
Fishing catches simplified (best options)
Simple fishing rod
Perch (best for white fish fillets), any bait in the village pond, or waterfall. (Daytime best)
Eel (electric powder, or white fish fillets), maggots in the swamp (or sea?) in the daytime.
Bream (for quality fish fillets), maggots (or steel lure) in waterfall or river spots.
Good fishing rod
Silver Crucian (quality fish fillet x3, plus silver), lure, in the village pond, at night
Excellent fishing rod
Gold Crucian (blue fish fillet x4, plus gold), bait, in the river (day best, at 16% chance)
Goldfish (blue fish fillet x4), gem lure in the sea (best at night, 5%)
*(Mostly Gamepedia’s extensive Graveyard Keeper Fishing guide)
On onions rings and tavern grub
You have to buy most of the cooking recipes. A few others – like the Woodcutter and gypsy – require quests, or game progress to unlock.
That leaves just one that hard to chance on: onions rings
Turns out most of the guides for onions rings – including the wiki – are wrong. There is no ‘time of day’ element, or no quest progress, nor do you need anything in your inventory. (Correlation is not causation, guys).
You simply have to plant onions.
Possible only bronze*, but if not, silver and gold as well. That’s it. Plant onions, go talk to the innkeeper Horadric in the Dead Horse tavern, get the recipe for free.
*(Need to test that part in a bit))
Talking Skull Tavern meals
I was going to work it out, but it’s easier to Google, so here’s a salute to Demerol and his Steam post.
Food only sells during events, and the events dictates the best food, it seems.
Graveyard Fest
carrot cutlets, bronze star onion rings, bronze star burgers, bronze or silver star baked pumpkin, others
Comedy Standup
silver star burger, gold star baked pumpkin, silver star onion rings, silver star toasts with onions, others
Ms Charm Song
gold/silver star royal fish, silver/bronze star baked salmon, gold/silver star burger, others
Rat Races
gold star onion rings, gold/silver/bronze star grape pie, sandwich, red/green jellies, others
Bugs, or working as intended?
They are a few bugs and typos in the game, some critical, but others that feel iike it as not. These are progress related and can but annoying. As I mentioned at the start, events are linked and you can only speak to the person once a week. Miss the day while not paying attend, another week passes. Can’t find what you are missing, weeks, even years can pass. Most of these ‘bugs’ (not bugs) related to either Snake, or vampires, and are connected.
So, here I am, with a cathedral, nearly full skill trees, masses of gold, hordes of zombies, and 🤷. A Bing sang, I’m busy doing nothing.
The tavern is on hold as that progress in based on running around doing quests for Gerry, but I know that.
Ms Charm is on hold because I need progress with Snake, but I know that.
The Astrologer is on hold because I need progress with Snake, but I know that.
The refugee camp is on hold because I need progress with the Astrologer – though you might not guess it.
So, here’s my camp, 9/9, every one happy, two tents, well, professional kitchen, bee hives, fully upgraded crops, and no progress. Just don’t want to know. Nobody wants or needs anything. What the heck?
Why can’t I upgrade my refugee camp?
Spoiler alert, a vampire came to town when the refugees arrived and started to dine on the locals. That is. Complete the other unfished quests to continue this, but be aware, there is also a hidden achievement – Exterminate. If you progress the camp too far, you can miss the achievement, and the game doesn’t exactly cater for custom saves.
Benefits of the DLCs

Beyond the obvious gameplay and story benefits, I’ll briefly list some of those I’ve found so far. These include:
Level IV and V grave enhancements, allowing up to 32 points per grave.
New cooking recipes.
Several bag recipes (which makes everything a lot easier).
Four extra farms (with human workers) which – along with kitchens and a chef – provide a constant supply of free food. So many eggs!
Your own tavern, The Talking Skull, generating potentially high revenues via your army of Zombie vineyard workers, brewers and porter network. Include more storage, a professional kitchen, the ability to organise events (like comedy nights), and more.


DLCs, hidden achievements and spoilers
Here’s the problem:
The game does not support save points. If you are a 100 or 200 hours into the game you really do not want to start over for an achievement or similar because of some programmer’s decision.
There are a couple of such points. One early on when you get the chance to betray Gerry to the inquisition.
A second may relate to betraying or attempting to kill the vampire Alaric. (I didn’t try, but seems not to have an achievement tied to it anyway).
A third may relate to refugee camp progress and to Clotho’s memory. I didn’t take the chance. Exterminate is the rarest achievement in the game (only 0.6% have it at present).
Exterminate!
At some point in the game you will get a cut scene in a swamp with the Marquis. On exit you will be attacked by a golem. Including this, there are four to kill, or three more if you prefer, these lurk around the burnt out house, quarry and village pond.
The fourth is a game changer and – annoyingly – I didn’t save in time myself so missed out on one of the possible endings, refusing Lady Beatrice. There is no undo for this, no second chance, and it may impact on any later DLC’s. Let me say now, Lazy Bear are arses for not putting in staged and or player ‘save as’ options.
So, SAVE BEFORE YOU BUILD THE WATCHTOWER
I wish ii had read this guide an hour earlier, but c’est la vie. Graveyard Keeper – Beatrice’s Offer: What to Choose (Game of Crone DLC)
The encounter with Beatrice following the building of the watchtower changes the narratives for the end game.
i) Betray Beatrice from the get-go, save everyone.*
ii) Become Beatrice’s willing accomplice, save nearly every.*
iii) Agree to Beatrice, then betray her, the refugees can be saved, but the camp is utterly lost.
*From the end-game stand point, in makes no difference, but if there are more DLCS, well, losing the camp will cost you. So, you want to avoid that. If you lose Alaric, it could have repercussions later, though the dialogue gives him a way to return. However, you are now ensnared by Beatrice (and her ghoul army). Unless you refused to aid her nefarious plans.
There again, I’ve been feeding the town’s relative back to them in sandwiches and burgers and as seasoning, for months, so I was damned anyway. Ho hum!
Given your new perks, and Graveyard Keeper’s continued popularity, it is reasonable to expect more DLCs for the game,
Spoilers
Then are always things to do in the game, but still, there are times when you are running around in a circle and getting nowhere. One such loop is between Snake and the Astrologer.
Snakes wants a book from the astrolger, the astrologer wants a cleanig kit from Snake. Solution, they swap? No, that would be too easy. You are locked in 30 (out of 40) friendship and neither will give, so you need a third party, in the shape of Snake’s ex, Ms Charm. You have to progress this pair to overcome the impasse between Snake and the Astrologer.
Next is zombies. You can get lumbering oafs reasonably early, but quality zonmbies needs another unlock – you have to get on the Inquisitors good side, bribe his guaards with qulaity wine and generally compromise what little shred of dignity you have left to get another quest to find an evil black heart. And intestines. And brain.
Another struggle – one of the biggest, it getting enough blue (intelligence) points for the technology trees. There are ways, such as mindlessly cutting stone, making grave surrounds – and destroying them. Or you can focus on maknig gold and but a couple of books a week from the Astrologers. That is so much faster!
Links
Not all these guides cover the DLCs and latest patches, and some are a lot better than others, but I’ve found all useful in one way or another.
Lost Noob’s Graveyard Keeper Guide
Keen Gamer, Everything you need to know about Graveyard Keeper
Game pressure’s Graveyard Keeper Guide and Walkthrough (excludes DLCs at present)
Steam Community, Better Living Through Alchemy
The Gamer: 10 Ten Best Alchemy Items
Graveyard Keeper: All Crafting Recipes. This is a handy list to have. Maybe print it out.
Finally, of course, Lazy Bear games.
Dated guide (2018), but funny.

Bonus for making it this far.
Princess Leah: “SAVE ME, Obi Wan, you are my only hope”
Highlander: “There can be only one!”
Well, you can have several separate games at whatever stage, but only one game file each, as the rotten game has no ‘save as’ option!
There is an ugly way around this, and it’s not without risks, but it’s there.
In windows, the local files are stored under C:UsersyournameAppDataLocalLowLazy Bear Games, were ‘your name’ is your name, not literally yourname. If you are struggling to find the folder, or just want a quick jump there, you can simply run or search for %appdata% and copy the files into another sub folder.
Yes, sorry, it is that ugly! 🧟