
Baldur’s Gate 3
This will be a ‘work in progress as it’s a BIG game, and I’m still only in act one. Actually, I restarted as I wanted to play in tactical mode as a bard. Plus, it’s still buggy and more than a little quirky in places due to sleep (or not sleeping) messing with quests and timelines. Volocamp not turning up (ever) being the one causing me the most annoyance. Apparently, you have to have a long sleep before freeing him, or he disappears. Dumb, but it is what it is until it’s fixed.
Again, to reiterate, my guide is based on playing at the hardest level; at lower settings opponents etc are weaker, easier to overcome.
So, along with “How do I…” help (and spoilers), I’ll give tips as I go along. Take the mana-addicted wizard, Gale, slurping away on your party’s magic loot. At a certain point (and place) you bump into Elminster (THE Elminster), who helps with the problem, which is a relief as Gale was getting expensive to feed!
Then there are achievements…
Most are easy enough. Most.
The one I found annoying is to save Saaza (She cannot be caged).
My advice? Speed run it once you are familiar with the game. You have to free here from the grove, easy enough. Then free her from Minthara, fairly easy. Then rescue her once more from Moonrise… And therein lies the problem as any number of actions in the Goblin Camp will get her killed by script. She basically drops dead. Or spiders eat her or gets herself killed. What you have to do is save her from Minthara and then – without upsetting the goblin camp – leg it to Moonrise.
The other one people struggle with is Busker (earn 100g from performances, e.g. bard). The performance must be successful (or you get cheers, but no gold). You must remember to pick up the gold. And people can only be entertained once per long rest – e.g. you must go from area to area busking to different crowds, once a day. I’d scum save it to be honest. Or not, your choice, obviously. (I got it by wandering around Rivington, gathering small crowds)
A particularly annoying one (especially because of a bug) is the Jack-of-all-Trades achievement, where you have to be level 1 in 12 classes – within using Withers to respec.
It is very easy to misclick and end end with level 2 in something (reload, try again), but if you pick Paladin before the last (12th) class you can run foul of morals and end up being an Oathbreaker – and this counts as a respec, even though you are still a paladin! (It may be that you can also fix this by paying a fine and reswearing your oath).
Ironically, you can use Withers to help you get the Jack-of-all-Trades achievement (thank you /reddit!). When you are levle 12 you can simply hire a henchman and – carefully – level them up to be the jack of all trades. Job done!
Another you may struggle with is rounding up all the tieflings across three acts. Any number of misteps can mess this up, such as not talking to one in an the Elfsong, or summoning Zevlon’s
‘Leave no one behind’
Challenge: Save every tiefling refugee you can throughout the game in a single playthrough.
This, arguably, is the hardest achievement as there’s so much to do and so many ways it can fail!
It is especially problematic playing as Dark Urge the game is hard-coded to kill Alfira in Act 1! There are guides that tell you “well, just knock her out in the grove” which works for the first time she would appear. However, travel to the Mountains or Shadowlands, and back she comes.
Solution?:
KO Dark Urge, resurrect him after? Nope, “one of your party isn’t ready”, so no travelling.
Travel, kill Dark Urge (Revivify scroll required)? Nope. After a sleep, despite being very dead, he wakes up fresh as a daisy, with Alfira dead.
Travel, send her Alfira away, safe? Nope, one of Bhaal’s minions does the deed.
Have to say, pretty shitty of Larian to FORCE this event. You should be able to fight the dark urges. When she arrives at your camp – and she is hard-coded to arrive – it’s a death sentence for her. Any loopholes are blocked by zone travel as an escapable trigger.
The only solution I’ve read of that may work is to keep knocking her out and repeatedly long resting (in the Grove) until an alternative bard shows up for you to be forced to kill.
Larian: “If you don’t have the Bhaals to kill Alfira, we’ll do it for you.”
Anyway, here’s a list of things you do (or may need to do):
Act 1:
1. Send the two tiefling scouts on their way before releasing Lae’zel from her cage.
2. Save Nadira by Killing the hobgoblin assassin in the druid grove.
3. Save Arabella from Kagna and her snake.
4. Save the kid (Mirkon) from the harpies on the shore.
5. Convince Rolan and his siblings to stay in the grove to protect the other tieflings.
6. Talk Arka out of killing the goblin (Sazza) in jail (If you fail Arka turns up dead on the trail).
The following are unlikely to be required, but I do them just in case:
Find and talk to the crippled tiefling in the supply shed and heal her legs.
Talk to the tiefling scout near the gith and red dragon. Talk to her just in case!
Similarly for Lakrissa, on her lookout post. She talks about a bet to get to Baldur’s Gate. Might be nothing. But still.
Act 2
1. Talk to all the Tieflings in the Last Light Inn – including Bex – and take any quests offered
2. Do not let a single Tiefling die during Marcus’s raid; kill him before he can kidnap Isobel. (e.g. If Isobel dies or is kidnapped, the shield falls, tieflings die, you fail).
3. Save Rolan from the shadows (near Moonrise)
4. Find and help Arabella (near the Healing House) and complete her quest. (Her parents, found dead, cannot be rescued). NOTE that this, like so many others, is apparently precicely scripted:
You must help Arabella, send her to your camp.
Next find her (dead) parent and talk to the undead nurse that killed them
Then return to Arabella (in your camp), rest (sleep) a day. Finally, talk to them both again. (Update: Find Arabella’s parents)
5. Rescue the four Tieflings from the Tower Prison, ideally escaping via the boat.
6. Then talk to ALL the rescued Tieflings and their friends/partner (e.g. Roland, Bex, Alfira).
7. Rescue Zevlor drop his pod in the illithid colony
8. Find Mol’s eye patch for quest update. (You don’t actually find her, only her eyepatch)
Finally, to the Nightsong after the final fight, when everyone reunites – so, do not let Nightsong/Dame Aylin die in the fight!
Funnily enough, I really thought I had “Leave No One Behind” in the bag on the last playtheough. Sadly, not. The only tiefling to die in the entire playthrough was an Eltural scout (when the Inn was attacked) – not even one of the original tieflings from the grove. But it was honour mode and I had no do-over. I hoped I’d be OK, but alas not! Unless I missed something else :/
I have completed every other achievement, including honour mode, but this one tasks me.
Act 3
1. Talk to Alfira and Lakrissa (on roof of the Elfsong tavern, Lower City).
2. Talk to Rolan in Sorcerous Supplies, get the insight that his boss is a bully, then talk to Lorroakan’s image. Next, portal to the wizard, talk to him about his plans for Nightsong, then him and get Rolan promoted.
3. Find and talk to Arabella in the sewers
4. Talk to Mol in the thieves guild. (Update: Finding Mol) (Don’t let her get killed in any fights there!) (Ideally recover her contract, but it seems not to matter)
5. Finally, do NOT summon Zevlor’s hellriders in the end fights. (If any of them die you won’t get the achievement).
The following is unlikely to be required, but I’d do it anyway, just it case:
Talk to the two groups of tieflings in the Rivington refugee camp, near the requisition barn (Mattis and Murkon; Zorru, Bex, Danis, Umi and Ide)
As I still don’t have the achievement, despite several tries, I’ll include this Leave no one behind link, which covers a few things I did do – but maybe didn’t do precisely right! (Noting he doesn’t mention not Zevlon’s raider, probably because he never summoned them. If he had…)
It is actually frustrating becuase simply talking to people in the wrong order, killing someone too soon or even failing an insight check can make you fail the achievement – and you won’t know until the end of the game, some hundred hours later.
Rinse and repeat.
(There are other order bugs that get annoying. For instance, if you encounter Ansor before you get a book about him, you can’t get rid of a questionmark over Wyll’s head!)
Notable LOOT in Act one
Thought I’d add this to the start, get it over with. Having the right gear can be a game changer.
For staffs, I’ve assumed two-handed (1d8), one-handed they are 1d6
They are a number of items giving or benefitting from lightning charges, even builds centered around them. There are other builds based on gear (etc), such as reverberation
Items temporarily (or even permanently) giving momentum (movement +5′) should not be overlooked as getting to or away from enemies or area effects can often change a battles outcome.
Nautilus
Everburn Blade: (greatsword, drop)
2d6 +1d4 fire
Hellrider’s Pride (gauntlet, quest reward from Zevlor):
On heal, target gains resitance to bludgeoning, slashing and piercing attacks (for 2 rounds?)
Smuggler’s Ring (loot on skeleton, off beaten path):
+2 to stealth and slight of hand, but -1 to charisma
Whispering Promise (ring, sold by Volo):
On heal, target gains 1d4 to attacks and saving throws for 2 rounds
Blighted village
Warped Headband of Intellect (drop):
Set Intelligence to 17 (+3 to rolls)
Bracers of Defence (chest loot)
+2 to armor class if not wearing armour or a shield
Haste Helm (chest loot)
Gain 3 momentum for 3 rounds at the start of combat
The Speedy Lightfeet (chest loot)
Gain 2 lightning charges on dash or similar action
Goblin camp
Amulet of Misty Step (chest)
Grants Misty Step (once per short rest)
Boots of Aid and Comfort (boots, buy from Goblin trader, Grat)
When the wearer heals a target, it gains an additional 3 temporary Hit Points
Crusher’s ring (drop)
Movement +10 feet
(One of the best rings in the game, in my opinion!)
Gloves of Archery (gloves, buy Grat)
Gain Proficiency with longbows and shortbows. In addition, your ranged weapon attacks deal an additional 2 damage.
(Might be useful early on)
Ring of poison resistance (loot on skeleton):
Poison resistance (useful early ring)
Swiresy Boots (boots, buy from Grat)
Athletics +1
Jump distance increased by 5′
The Watersparkers (chest loot)
Standing in water electrifies it. If should in electrifies water on your turn gain 3 lightning charges.
The Whispering Promise (ring, buy from Grat)
When you heal a creature, it gains a +1d4 bonus to Attack Rolls and Saving Throws for 2 turns.
(Zhent trader (Roah Moonglow) is worth a look too, but I can’t remember anything worth buying)
Waukeen’s Rest
Harold (heavy crossbow, quest reward from Zhentarim)
1d10 +1 +1 bane for 2 turns (target saves vs charisma)
The Sparky Point (trident) OR The Jolt Shooter (longbow) OR The Spellsparker (staff)
(Rescue reward)
When the wielder deals damage with [this] they gain 2 lightning charges
The Jolty Vest (medium armour AC14, Zhent trader)
You take 1 less from slashing damage.
Countershock: When the wearer takes damage while having lightning charges, the attacker must succeed a Dexterity Saving Throw or become shocked.
Titanstring (longbow, buy from Zhent trader)
1d10 +1 + strength modifier
Hag swamp
The Sparkle Hands (chest)
Highly conditional but can be good vs automatons and metal-clad opponents as, if you have lightning charges, your attacks against them hit with advantage.
If fighting unarmed you gain 2 charges on hit – but there are other ways to acquire these charges
Underdark
Thulla, in the underdark (quest reward)
Boots of Speed: click heels
Blurg in the Underdark has a number of decent (early) items too. I’d say about 1,200g worth before any discounts, but it costs around 800g in donations to get a 25% discount, which would leave you 500g out of pocket. Put perhaps you’ll meet him later?
…
Derryth Bonecloak, another Underdark trader, has items of interest too, including alchemy component, a Caustic band (ring, +2 acid damage to attacks), an Amulet of Restoration (healing word) and a Ring of Jumping
Light of Creation (halbard, drop)
1d10+1 +1d6 lightning
Chance to stun the wielder on attack.*
*(The Gloves of the Automaton – purchasable in Act 2 – grant Circuitry Interface, which negate this stun chance).
Mourning Frost Staff (find and combine 3 parts)
1d8+1 +1d4 cold
+1 to cold damage, chance to chill with cold damage.
Grants Ray of Frost as a cantrip.
Spectator Eyes (amulet, drop)
Grants Ray of Fear and Wounding Ray as a levle 3 spell
The Sparkwall (ring, chest)
Lightning resistance
Wearer cannot be electrocuted*
*(Does not negate chance of stun from Light of Creation)
Grymforge
Adamantine (items), crafted
(Detailed below)
Bow of the Banshee (shortbow, trader/drop)
1d6+1, chance to frighten target on hit.
+1d4 vs frightened.
Disintegrating Night Walkers (boots, drop)
Can’t be enwebbed, entangled or ensnared.
Can’t slip on grease or ice.
GRants Misty Step (once per shrot rest)
Firestoker (hand crossbow, chest)
1d6+1 + 1d4 piercing if target is burning
Necklace of Elemental Augmentation (chest)
When your cabtrips deal elemental damage, add your spellcaster modifier to the damage dealt.
Shining staver of skulls (light hammer, trader/drop)
1d4 +1d4 radiant
+Light
The Protecty Sparkwall (cloth armour, chest)
+1 to spellsave DC
+1 to armour class and saving throws as long as wearer has lightning charges
Wondrous gloves (drop)
AC +1, bards gain +1 Bardic inspiration
Mountains
Lady Esther a few nice items, including:
Boots of Elemental Momentum (boots)
Athletics +1
Dealing elemental damage with spells or cantrips grants momentum for 2 turns
Cacophony (staff)
1d8 +1d4 thunder
Grants Thunderous Smite (level 1 spell, once per short rest)
Gloves of Cinder and Sizzle (gloves)
+1d4 if unarmed (i.e. for monk), grants Scorching Ray (level 3, long rest)
Hoppy (war pick)
1d8+1
Notably includes ‘Revitalising Strike’ option: smash into a foe, wounding them and healing your own injuries.
On a hit, heal 1d6 HP and deal additional necrotic damage equal to your proficiency bonus (with war picks).
Periapt of Wound Closure (amulet)
Grants the wearer maximum benefit from heals, and wound closure if they are downed.
PRO TIP Works with spells AND potions. Get max benefit out of battle by sharing this amulet around the party to maximum healing.
e.g If Karlack needs 40 healing, equip the amulet on her and give her 4 doses of ‘Potion of Healing’ instead of (say) 1 ‘Potion of Superior Healing, saving the latter for use in battles.
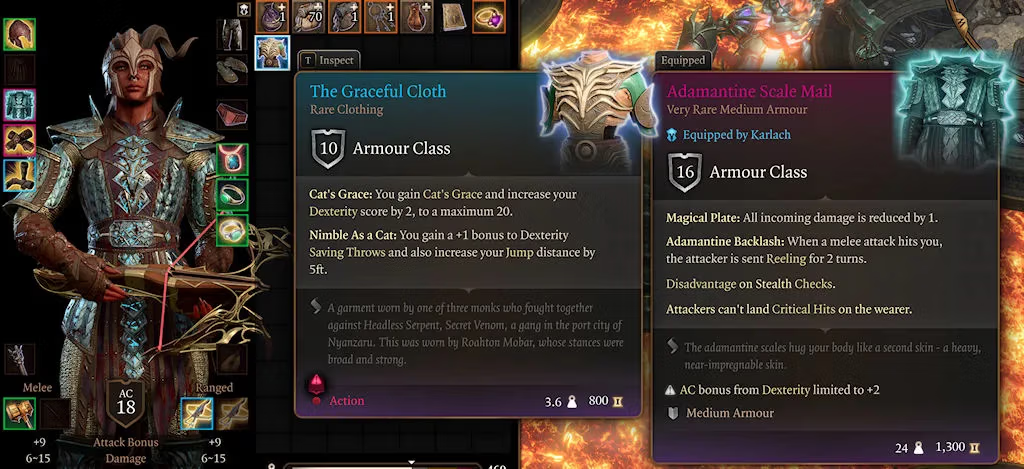
*The Graceful Cloth (cloth armour)
While equipped, grants Cat’s Grace as per spell (gain Advantage on dexterity checks and resistance to falling damage)
+1 to dexterity saving throws
Increase your dexterity by 2 (to a maximum of 20)
Also increases your Jump distance by 5′ (1.5m)
If you can find and stay on the right side of the Gith, their quartermaster (A’jak’nir Jeera) is worth looking in on too:
Daredevil gloves (gloves, buy)
+1 to spell attack roll
Ranged spells are made as melee spell attack when adjacent to hostiles (i.e. no penalty). (Toggle on/off option)
*Gloves of Dexterity (gloves, buy)
Attack +1
Sets dexterity to 18
*(Does not stack, e.g. wearing Graceful Cloth (dex +2) with these won’t give you dexterity of 20 because these gloves set your dex to 18).
King of the Undermountain (shortsword, buy/drop)
1d6+2
Advantage vs obscured targets
Reduces number required for a crit hit by 1 (stackable). Apparently this applies to spells too.
Vital Conduit Boots (medium armour, buy)
Athletics +1
Gain +8 temporary HP when casting a spell requiring concentration
Creche Y’llek
Circle of Psionic Revenge (drop)
When you succed a saving throw the foe that caused it takes 1d4 psychic damage.
Githyanki also gain +1 to int, wis and chr saving throws
Necklace of Elemental Augmentation (amulet, chest)
When your cantrip deals elemental damage, add your spellcasting modifier to the damage dealt.
(e.g. For a warlock, sorcerer or bard with 18 charisma (+4), your cantrips do +4 damage, +8 with a crit).
Soulbreaker Greatsword (drop)
2d6+1 (+1d4 psychic if wielder is Githyanki)
+2 to initiative
Varsh Ko’Kuu’s boots (quest reward/drop)
Grants acid resistance
Immunity to acidic surfaces.
Fight tactics: pushing back
I added this after replying to a comment about pushing Bernard out of a window.
They are several reasons and ways to push people and objects back. For instance, knock them down into chasm (good vs spiders). You can’t loot, but they are out of the fight. Blasting them off a ledge or out of a window; if might not kill them, but it’s gonna hurt and takes them out of the fighht a minute. Or simply hit and run tactics: knock them backwards and retreat as far as possible. If the are out of range (melee or otherwise), they can’t hit you, if they have to rush forwards, they are using their action and generally can’t attack that round.
Anyway, while your targets size and mass is a factor for physically pushing them away (i.e. with strength), spells and explosives can ignor that roll. With that in mind:
It depends on your strength, but spells etc can work too.
I replayed that (Bernard) fight only last night (on normal difficulty) and had no trouble at all, but level and choices can be a factor.
Karlach (strength 19) can push him back a bit, even out the window – if close enough – just not sending him flying 20′ like a goblin might.
Wyll (warlocks in general) can blast him out the windows using Eldritch Blast with (option) Repelling Blast (push back a creature up to 15′)
Any character with a bow or crossbow can use Arrow of Roaring Thunder (push back targets 17′)
Certain spells (or items enchanted with that spell) can knock back, e.g Thunderwave (e.g. Ring of Absolute Force)
Some Illithid powers can push people and things back too, (e.g. Force Tunnel (13′) and Repulsor (20′))
Powering up on the Nautiloid
I’ve covered this in the past when you could be a tad more creative, but it still works; you just can’t kill all the devils.
Still, it is easy to get the Everburn 2d6 +1d4 fire damage two-handed sword simply by using Command to make the devil drop it. Even on the tactical (hard mode) setting, it is no trouble to grab the sword, kill the illithid (75 XP) and escape. Killing the illithid and the Cambion commander though (150 XP) is a lot harder and needs either godly luck or scumsaving every turn!
In the video below, I managed it on the fourth try – and without scumsaving.
You land on the beach at level two and on the way to level three. In the early access, (or if you somehow managed it without mod cheats) you could get to level 3 with the other two devils.
Seems hard to push for levels so early, but even on normal difficulty, it can get hard even in Act 1.
For instance, I ran into a group of level 6 undead, killed most – and they healed the dead back to ‘healthy’ undead. I killed them again, and back they popped. It was a long fight! I can tell you that mass-healing undead zombie-ghast-anti-paladin thingies are quite a surprise the first time around! You’ll be please to know there is a spell to help mitigate this. Maybe don’t go to new, higher-level areas until you are ready!
Beach area, ruined church and druid camp
This is mostly wandering around, killing (or not killing) everything in your path. You can get decent XP taking the dialogue path as often as not. Thoroughly exploring this starter area should net you five soul coins and other goodies.
If you wonder how to cure the crippled Tiefling, lessor restoration does the trick. There is no reward, but it’s the right thing to do.
If you are into achievements, the hidden “Leave No One Behind Achievement” to save all the Tieflings refugees possible needs an early start! I don’t think the guide is foolproof as actions can have later consequences*. Still, includes all the ones I missed on my tactical playthrough. *(Butterfly effect and all this)
The above actually ties in to another hidden achievement: ‘She cannot be caged!’. Here you have to rescue the goblin Sazza from the Emerald grove, then from the goblin camp, then yet again from Moonrise towers.
As you progress, you should be able to add the various members to the parties and camp, including Karlack (who’s awesome), a dog (Scratch), Volo, and an Owlbear. Do keep looking for cheap, less-than-useful magic items to feed Gale until we can cure his needy addition!
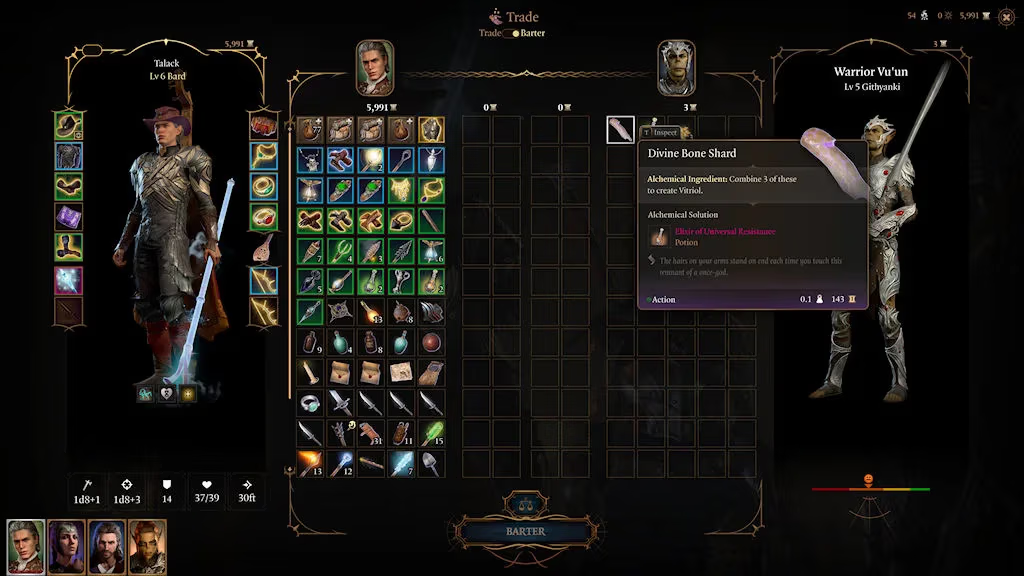
I haven’t made a list of all the people you can trade with, but, as the load screens say, you can trade with a number of characters and npcs, both in and out of your camp.
Top tip: Maybe don’t alienate all the monsters and evil creatures until after you have squeezed all the gold and XP you can out of them :D
You might like to know there are several ways down into the Underdark that bypass the goblin-overrun temple, but it’s a good place to explore, so have at them all.
Attitude, charisma and trade prices
As far as I can tell, zone/area quest actions do not affect merchants attitude, nor does charisma (though that does affect prices!)
Note that the amount of donations needed to improve attitude is relative to game game difficulty AND progress.
Direct actions – including misclicks and atempted thievery – however do.
For instance, I was buying supplies with Shadowheart, clicked ‘balance offer’ and commenced to trade. Or not! As I’d forgot to drag the transferred money across, every time I clicked ‘barter’ his attitude worsened. I assumed it was my mouse, but no, the constant pressuring for him to barter without a gold top-up made his angry.
So, to improve attitube, you have to give them gold or stock. At 100 attitude you get a discount and bonus to sales. A winner?
Well, inititally (neutral attitude) I offered an Act 3 trader a sack of gems worth 13,480g. He offered me just 5,400g, which is a poor deal
So I donated 4,500g to smooth trade, you know, cash in hand, no need to tell the tax collectors, eh. Boom, 100 positive attitude. Best buddies.
I again offered him the pouch of diamonds and he now offers me 6,800g. Better by 1,400g, not nearly to cover the 4,500g invested in attitude.
Tactical mode is a lot harsher, so normal (here) is probably around 3,000g in donations, while easy is less again. But as this is a per trader arrangement, you can’t go giving them all a cartload of gold. If you are offering 4,500g for a 25% boost, you are going to be needing something like base plus 20,0000g just to break even!
Also, and you have to watch for this, in future interactions you have to begin trade using your main or the party member who first negotiated the attitude improvement. If you start with anyone else their attitude is neutral.
Here’s an example, buying chainmail +1 from Dammon in Emerald grove.
‘Tav’ (your main) with a charisma of 17 (+3), inititates dialogue. Attitude is 100 and the price is 390g.
If I click on another party member this attitude – and price carries across.
Next, Wyll (with a charisma of 19 (+5)) inititates dialogue. Now attitude is neutral (0) and the price for the same object is 494g.
Again, if I click on another party member this attitude – and price carries across.
Finally I inititate dialogue using Shadowheart (charisma 8, -1). Again, attitude is neutral (0), but now the price has risen to 676g.
Repeating this with Arron in Emerald Grove, but with Wyll donating to raise attitute, my main is neutral, as are the rest of the party. So, the best long term solution is to always have the character with the highest charisma negotiating attitude improvements, sales and purchases. Now, because Wyll has a higher charisma than my main (by +1), the price of the chainmail +1 is down to 364g
Expanding upon this, my advice is this:
Hoard stuff in your camp until you find a merchant you want to spent a LOT of gold with. Save, and see if you are better off after buying your merchant club card. Otherwise, you are just throwing gold down the drain.
The Underdark, part 1
I’ll jump ahead here because this is how I am playing through. On my current reply I used featherfall from to leap from the Blighted Village spider tunnels and drop into the underdark, it’s a handy shortcut to get access to traders like Blurg early. Jump in, shop, return to the surface in better gear.
I got the jump on the beholder by luring it into the Selunite outpost and stomping on it, and then I sidled around, popping into the fishermen and then into the tower. You can batter away at the defence turrets* or – as I did – jump around the building and turn them off. No XP for doing so, which surprised me, but hey ho.
* (Crit hits with frost cantrips do the job).
Anyway, sooner or later, you run into Bernard and his mates. You can chat, collect most of the loot, and leave, or you can provoke a battle for a half-decent weapon and hope you don’t end up wanting Bernard alive in a later act. I’m assuming now, so I went all Sarah Conner on him!
Besides, the XP from this fight nudges me to level 5.
How to easily beat Bernard at any difficulty.
The trick is threefold:
Firstly, separate and place the party strategically.
One flower is enough, but you can make the fight easier still by using more flowers and or using strong characters, strength potions, or – and I did for Astarian – equip the club of hill giant strength (from the same room).
Secondly, drop a Sussur flower on the elevator. It won’t stop Bernard, but it will nerf his electric field and disable the regular Animated Armour (in range).
(Now save ‘cos RNG!)
Finally, initiate combat via dialogue* and blow Bernard out the window.
‘Arrow of Roaring Thunder’ is great, but other knockback attacks like a warlock’s ‘Eldritch Blast’ also work.
*(If you attack without this, he’ll heal up and come running; you ideally want him damaged. If you are wondering, you can’t push or chuck him out the windows; he’s too heavy, even with a strength of 21).
Finally, push or throw the animated armours onto the lift.
Firstly, it nullifies the magic on the armour, taking them out of the fight. Secondly, it turns out this stops Bernard from using the lift to slaughter your party. You can now pepper him with arrows and frost cantrips from a safe distance to finish him off.
Yes, it took a few tries to find the best solution, but now you know there is less or no need for cheesing.
The Underdark, part 1, continued
Next, carefully avoiding the Duegar, I unlocked the beach teleport and sidled around to the mushroom camp and that portal. It is pretty roundabout, but it saves running into the minotaur until I’m ready. You can get the jump on these if you can find the optimum back entrance into the Underdark.
That was and remains a pretty solid tactic. Gather up Myconid area quests, add the fungal guy to your party, then head north west and rescue the errant husband
Next, head north, adding a hook horror to the party and clearing out that area. You can end up replacing the hook horror with the bullete, which is always fun. Finally, head back to the Underdark beach and deal with the Duegar and any other troubles.
It should be noted that at this point, I haven’t finished the Selunite temple (so not angered the goblin army), nor explored the area west of the Selunite outpost.
Act 1: back into the sunlight for a spell!
You should have had Karlack in the party for some time now, but if not, maybe go get her and deal with her tormentors*.
*(I’m assuming you are playing heores, not villains. The optimum path is the same; the outcomes are on you.
So, saving often, ‘cos it starts to get tricky now, rescue the two guys being assaulted by the gnolls (do it right, and there’s a rare reward for you!), then continue west, ploughing through the gnolls and then go to play hero at Waukeens rest. After that, now or later, you can fight or negotiate with the angry Gith.
Here’s the clever part. done right and ideally still on reasonably friendly terms with the Zhentarim traders in the area, you can, if you find it, hop down into the Zhentarim’s unprotected Underdark stash and loot the lot. Moreover, because of its vantage point, as mentioned earlier, you can jump on the minotaurs. They struggle to reach you, so pepper away. Threat nullified, you can finish exploring and return to the surface.
I think the temple is the better choice. You can, for instance, separate one of the leaders and deal with her alone, in private. Another, you can take to the rafter and, done right, it’s a short fight. Then it’s just mopping up and looting.
Swamp, Ethel and hag
You should be about ready to deal with all the swamp denizens now. Tactics are always better than macho toe-to-toe, I find. Fight at range and keep them away; go high, or island hop, and wear them all down.
If you uncovered the shadow druids, go and finish that up, then return to the teahouse to deal with the hag.
(‘Deal’ could, of course, include a discourse where you volunteer your remaining eyeball (having perhaps previously surrendered the other orb to Volo’s surgical skills, or lack thereof. This game, I tell y’…)
Anyway, the start is pretty much the same every time, you cause a ruckus, she runs away, you follow her – and things get complicated. I have played this next part many times. The best solution is not to play by their rules!
You can’t save everyone, but perhaps you should try?
You cannot get the mask of the pawns, so don’t try. Charm, freeze, pickpocket, nothing works.
Now, you can run past them and have them attack you all the way down and take out the hag, but it’s a pain to do. There is one solution I found, though, so I’ll take the win!
It’s a bit unorthodox, but end-fight RNG aside (or Larian nerfing it later), it works every time. Here’s how:
Just send one person in using an invisibility potion or spell. You want to get past the four pawns for the moment. Next, using leaps and/or featherfall, make your way down past the traps, but no further, for a moment.
Caution!
If you approach the girl, Mayrina or her release, you will probably die, so keep to the right and through the hag’s door. You can safely loot this room now, if you want. Regardless, push on a touch and jump into the mushroom circle, which transports you outside again.
Gather your party up, jump back into the circle and you’ll find yourself close to the caged girl at the bottom of her lair.
Now, you fight, but on your terms!
Ooops!
The hag now summons the pawns you wanted to avoid.
Awkward!
Ignore them! Honestly, ignore them. It’s not (just) that they can hit hard, it’s that they get magic retaliations that are basically triple hits/crits. Nasty business. If you ignore them, or just shove them out of the way, it essentially nerfs them. So, focus 100% on the hag.
Silence helps.
The aggressive minions will turn passive with the hag’s death, though, sadly, of you only free one of the pawns.
Note!
If you have it, Lump’s War Horn is useless beyond this point as you move out of their range.
Act 1 so far, by the numbers
Note that this excludes the mountain pass and the Duergar area of the Underdark; these I’ll do next. If you do these areas before finishing up, it messes things up. People die, quests end, and loot is lost. You get the idea.
Gold: 6,000g
Level: 5 (900 XP away from 6)
100+ bottles of wine for the party.
You’ve maybe seen videos of “Let’s blow everything up?” Did a few myself for Nautiloid. Silly, but good fun all the same. I might have missed one or two, but here’s my end tally:
Oil barrels: 21
Firewine barrels: 35
Gunpowder barrels: 10
Prefer reading? I have over 150 books, pamphlets and notes. (There is an achievement for reading 100)
Without killing off party members, there are five Mindflayer parasite specimens to find.
No use for them yet (or ever?), but I also found 15 bronze ingots, 13 silver and 2 gold.
(I’ll add alchemy in a bit, perhaps in a certain section.)
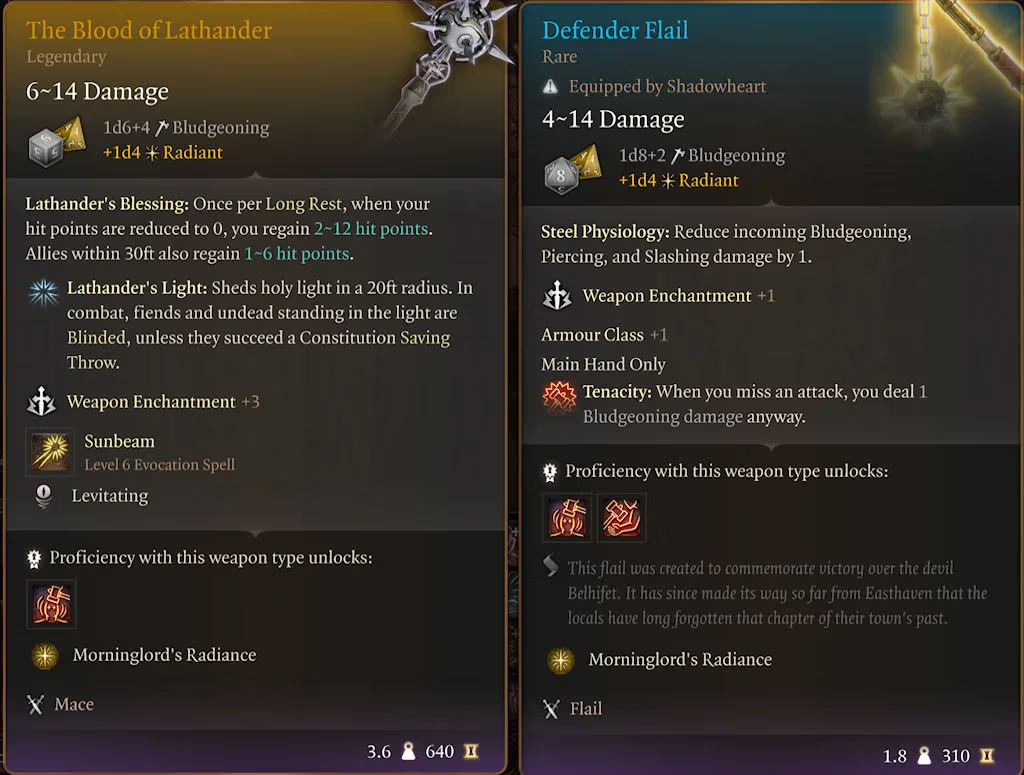
Mountain path
I suggest you go to the mountains first as there’s a very nice legendary mace to find. Plus, the zone is relatively small. There are one or two people or the path you’ll want to find, a bunch of nasty undead that don’t take well to ‘Spirit Guardians’ or radiant energy, and the temple and Gith creche.
There’s a funny little bird to chat with, with less than politically correct opinions on eagles. Having explored all the options, I agree that the bluejay is correct; the giant eagles can be are quite unreasonable. Note that you can retrieve the ceremonial warhammer from the nest peacefully using stealth.
Exploring the entire Gith creche peacefully, trading and so forth is possible. This is the preferred option (at least initially). Expect some tough battles if you decide to take a more permanent stance.
There are three more Mindflayer parasite specimens to be found here.
I am still wandering back and forth here, but the prime reward is the legendary mace. The rest is just icing on the cake.

Grym Forge
Depending on your desired outcome, this can be a particularly tricky area to manage. You really need to do it in a day (no long rest), or people can die. Even if you are a raving, psychotic, chaotic evil type, smart villains have a plan. Going to sleep and letting your target die ignobly tends not to reward XP, for instance.
Being a noble hero and murdering all the villains, though, that’s righteous, right?
Also, possibly a bug, I went through a barrier at one end of the zone, and Nere died just like that. It’s like, “Entering this area triggers a death scene”. But enter the same area another way, everything is fine.
Philosophy aside, it does matter, as even small changes can alter outcomes. For instance, if you are initially in disguise when you (reencounter) Barcus Wroot has one outcome, showing up as yourself and giving him the nod has another. In the latter case, getting him to join your camp is possible. That said, I have yet to get him to rejoin my camp (again). As shown in this video, Barcus Wroot says, “Well, you did it…” and the conversation continues. Or not. I did rescue him previously, so the dialogue should be there, but it’s cut off.
Upon freeing him (again), he (should) insist on his search for his friend Wulbren. If you convince him he’ll only get caught again he’ll change his mind and join your camp. At present, that line of diagolue is not an option for me. Whether this is because I’m playing on tactical, a quirk of dialogues or, another bug, like the one currently cutting off 1,500 lines of dialogue if you follow the evil path.
Apparently it’s a bug – the issue is that after rescuing him in Grymforge, if you talk to him with your main character he won’t have an option to be invited to your camp, and will not appear in Act II.
Talking with any other character seems to work though.
More annoyingly, and – it feels – pushing a gay Pride narrative(!), it is impossible to save Meerna. If Nere leaves the cave alive, he kills her in the cutscene. If you one-shot him (with Meena clearly alive and well), poof, she disappears. She doesn’t die; she isn’t killed. There’s no body, she’s just gone.
Regardless of what you do – short of murdering all the gnomes yourself – the gay deep gnome survives, and his husband is all, “Oh, you poor thing, is that a bruise?” This, bearing in mind a minute ago, all the gnomes were being mercilessly whipped and beaten, threatened with fires attached to their legs, ears ripped off, having their toes bitten off one by one and being told “I’ll peel your balls like potatoes if you don’t move.”
If it was a case of “well, they only made one dialogue”, fine, but they made two. In one scenario, her brother sees her covered before being tossed into lava and burnt alive. In the other, he’s running around frantic, looking for his sister, who never left the cave. Just felt shitty to me. Bad design and no closure for the bereft brother.
“OYE, LARIAN, A WORD, PLEASE!”
Cave-in
To save you trying combinations:
For the record, you can only get in with gunpowder. Brute strength, force-based spells, pickaxes, and even the adamantine mace all do nothing. Nor can you get inside with gasous form. Nothing else works; the game forces you to use explosives.
There are various options here:
Side with Nere, let him go on his way.
Kill Nere outright (lop his head off, loot).
Side with Nere to get information, THEN kill the murderous monster.*
*Huzzah for unambiguous morals – a mass murderer murderering yet another evil doer doesn’t make you a bad person, it seems.
Grey areas aside, the smart play is to free him, pump him for information and rewards, then, well him did push poor Meerna into lava…
(You can get two Illithid parasites from Nere, if you make the right choices).
It’s Grym up north!
I’m sure Karlack and a few of the deep gnomes would get the reference, but I was thinking more of the forge. On tactical mode, its protector has 450 health, does quake rages and is almost invulnerable to everything. On the plus side, it does reward 500 XP as a starting point.
There are a few paths to the forge, some more problematic than others. You can fighter your way there, for instance, or you can take the quick and easy route to the forge.
Anyway, you can find enough mithral to craft two items. I think the weapons are naff, but the armour is high quality, and the shield is a good all-round option. It depends on your character and party choices, but I recommend the shield and scale mail.
First though, there’s a Grym obstacle in the way.
Craftable Adamantine items:
Adamantine Splint Armour (Heavy armour, AC18)
All incoming damage is reduced by 2.
Intense Adamantine Backlash: When a melee attack hits you, the attacker is sent reeling for 3 turns.
Attackers can’t land Critical Hits on the wearer.
Disadvantage on Stealth Checks. No AC Bonus from Dexterity.
Adamantine Scale Mail (Medium armour, AC16)
All incoming damage is reduced by 1.
Adamantine Backlash: When a melee attack hits you, the attacker is sent reeling for 2 turns.
Attackers can’t land Critical Hits on the wearer.
Disadvantage on Stealth rolls. AC bonus from Dexterity limited to +2.
Adamantine Shield (AC +2)
When a melee attack misses you, the attacker is sent Reeling for 2 turns.
When a foe hits you with a melee attack, you can use your reaction (Shield Bash), to knock it prone unless they succeed a Dexterity Saving Throw.
Immune to Critical Hits.
Adamantine Longsword
1d8+1 slashing (one-handed)
1d10+1 slashing (two-handed)
Diamondsbane: If an adamantine weapon hits an object, the hit is always critical.
Lethal Weapon: This weapon ignores Resistance to Slashing Damage.
Adamantine Scimitar
1d6+1 slashing (one-handed)
Diamondsbane: If an adamantine weapon hits an object, the hit is always critical.
Lethal Weapon: This weapon ignores Slashing Resistance.
Adamantine Mace
1d6+1 bludgeoning
Diamondsbane: If an adamantine weapon hits an object, the hit is always critical.
Lethal Weapon: This weapon ignores Bludgeoning Resistance.
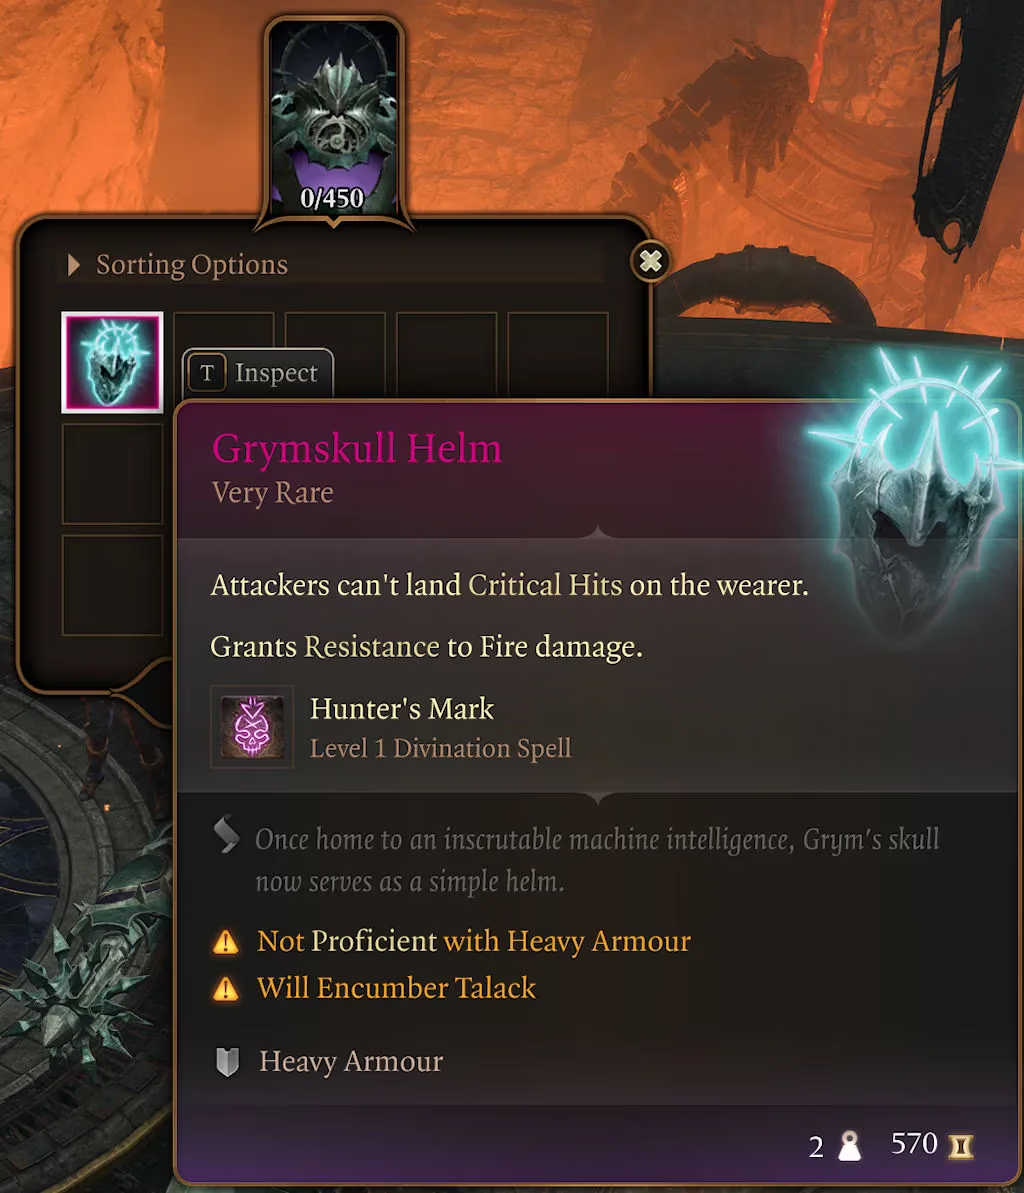
Bonus drop:
Grymskull helm (heavy armour)
End of act one
By the end of the mountains and forge areas tactical mode), I had spent all my gold and built up another 6,000g towards act 2, with a few thousand more gold available in gems, +1 weapons, etc. I was also nearly two-thirds of the way towards level 8 (5,784/9,000)
So many options, so much loot, and so many paths, so I’ll just focus on the Absolute… :)
If you have explored thoroughly yourself, along with a motley crew of camp followers, chests overflowing with gold, explosives and magic items, you could/should have acquired ELEVEN (or more?) parasites. I’m not for trusting it myself. Putting worms in your brain? Really? But some people will embrace the darkness inside.
Unless, that is, you want to chug down a gallon of AD&D Tequila, worms and all, and embrace your inner darkness and grow your illithid powers.
(The wiki guide missed at least one parasite, though. As I noted above, it’s possible to get two parasites from Nere).
To be fair, some of the powers are rather tempting: fly, repulse enemies, barrel through enemies, bonuses to attacks, intimidation, and persuasion. What cost to your soul, though?
See also:
Next: Baldur’s Gate 3: Act 2
Next: Baldur’s Gate 3: Act 3
Gamerant: Baldur’s Gate 3: All Negative Combat Status Effects, Explained
Gamerant: Baldur’s Gate 3: All Positive Conditions & Buffs, explained (and surface types)
Fextralife wiki: Status and effects